


Think metal art needs a welding torch and a studio? Think again.
You can make charming garden sculptures from cans, spoons, and old bike parts without welding, fancy tools, or a big budget.
This post walks beginners through easy projects like tin-can flowers, spoon-petal blooms, and simple spinners, plus the tools, safety tips, and weatherproofing you actually need.
You’ll learn step-by-step methods you can finish in a morning or a weekend, where to find free scrap, and how to avoid common mistakes.
Ready to turn trash into playful yard art?
Beginner-Friendly Ways to Start Making Recycled Metal Garden Sculptures

Recycled metal garden sculptures are perfect if you want to try something creative without dropping a ton of cash or spending months learning complicated skills. You’re starting with materials that already have shape and finish, so you’re not wrestling with raw stock. That alone makes everything easier. Most DIY recycled metal garden sculptures for beginners use techniques you can pick up in an afternoon. Cutting with hand shears, drilling a few holes, bending with pliers, connecting pieces with wire or small bolts. No welding. No fancy metalworking setup. Just a small workspace, some patience, and the ability to see potential in things most people throw away.
The beauty of upcycled garden art ideas for novices is that every project teaches you something without punishing mistakes. Cut a can too short? Adjust the design. Drill a hole in the wrong spot? Drill another. Metal is forgiving that way. And because you’re using scrap metal art projects step by step, the material costs almost nothing. A typical small sculpture uses 3 to 5 tin cans, a handful of old spoons or forks, maybe a coat hanger for a stem, and a stick or rod for staking it into the ground. Total cost runs $5 to $30 if you buy fasteners and paint. Time commitment is usually 30 to 120 minutes per piece, which fits into a weekend morning or a couple of evenings.
Weatherproofing makes these sculptures last. After you build, you prime the metal with a rust-inhibiting spray, paint it with exterior spray paint (1 to 2 coats), and seal it with a clear topcoat (2 coats). That three-layer finish protects against rain, sun, and humidity. The process is simple and stays the same for almost every project. Once you’ve done it a few times, it becomes automatic.
Six beginner-friendly starter projects:
Tin-can flower stakes using 3 to 5 cans, wire stems, and a quarter-inch rod. Spoon-petal garden flowers with flatware petals fastened around a painted center. Wind spinner made from a hubcap or circular scrap metal attached to a bicycle spoke. Animal silhouette yard stake (cat, bird, butterfly) cut from a 12-by-12-inch sheet. Stacked can totem using 6 to 12 cans riveted onto a central rod. Abstract sculpture assembled with bolts, nuts, and 18-gauge wire (no welds needed).
These eco-friendly upcycling benefits go beyond saving money. You’re keeping metal out of landfills, learning skills that apply to other home projects, and creating something that looks intentional and cheerful in your yard.
Essential Tools and Easy Techniques for DIY Metal Garden Sculptures
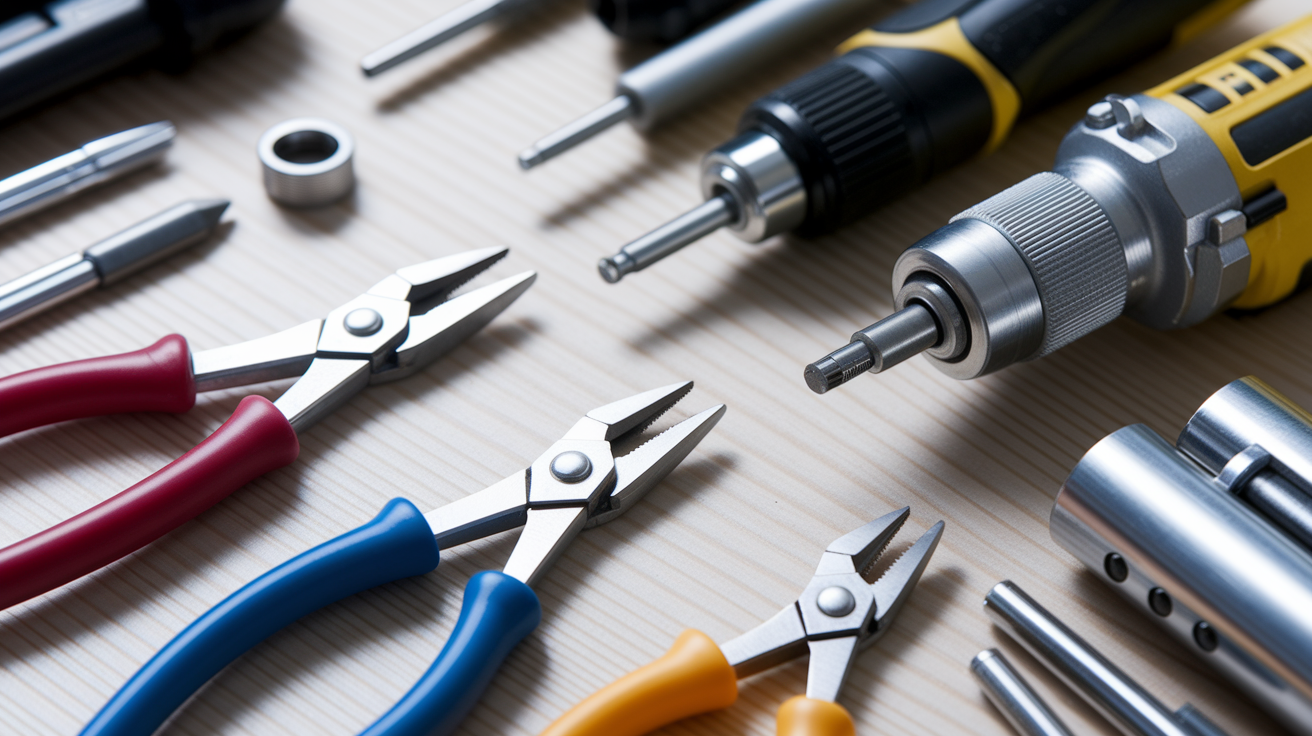
You don’t need a shop full of power tools or expensive equipment to make hand tools for metal crafting work for you. A beginner kit fits in a small toolbox and costs $40 to $150 if you’re starting from zero. Tin snips run $10 to $25 and cut thin metal cleanly. Needle-nose pliers and locking pliers together cost $8 to $25 and let you bend, hold, and twist wire or small parts. A cordless drill with a set of metal drill bits (bought used for $40 to $75) opens up fastening options. A pop rivet gun ($12 to $25) joins thin metal without screws. A metal file ($6 to $15) smooths sharp edges. Clamps or a small bench vise ($20 to $60) hold your work steady while you cut or drill. That’s it. Everything else is optional or something you can borrow.
Basic metal cutting techniques for hobbyists start with marking your cut line with a permanent marker, clamping the piece down, and cutting slowly with tin snips or a hacksaw. Let the tool do the work. Rushing creates crooked edges and tired hands. After cutting, file the edges and use 80 to 220 grit sandpaper to remove burrs. Drilling is straightforward. Mark your hole, start with a small pilot bit, then step up to the size you need. Using bolts and rivets instead of welding gives you strong, weatherproof joints without heat or special gear. Most beginner sculptures use quarter-inch bolts for small joints, three-eighths-inch bolts for bigger connections, and three-sixteenths-inch pop rivets for attaching thin pieces like can lids or license plates.
Five non-weld fastening methods that work outdoors:
Pop rivets (3/16 inch) for thin sheet metal and layered pieces. Bolts and nuts (1/4 inch or 3/8 inch) with stainless or galvanized finish. Wire-wrapping with 18 to 22 gauge galvanized or copper wire. Two-part epoxy or metal-rated construction adhesive for permanent bonds. Silicone adhesive for decorative elements like marbles or glass beads.
Simple wirework and bending methods let you create stems, antennae, or loops. Use pliers to grip the wire close to the bend point, then pull slowly. For tighter curves, wrap the wire around a dowel or bolt shaft. These welding alternatives for non-welders give you flexibility to build almost any design without investing in a welder or learning to strike an arc.
Safety Basics Every Beginner Should Know Before Making Metal Art

Metal has sharp edges, and power tools move fast. Taking a few safety steps means you finish your project without a trip to urgent care. The most important piece of safety gear for DIY metalwork is a pair of cut-resistant gloves rated ANSI level A4 to A6. These gloves let you handle sheet metal, cans, and wire without slicing your palms or fingertips. Safety goggles protect your eyes from metal shavings, paint overspray, and tiny fragments that fly off when you drill or cut. A respirator matters when you’re spray-painting or grinding. Use a P95 or P100 respirator for dust from sanding and grinding, and swap in an organic-vapor cartridge when you’re using spray paint or adhesives. Hearing protection (foam plugs or over-ear muffs) is worth wearing if you’re using an angle grinder or reciprocating saw for more than a few minutes.
Sharp edges are the biggest beginner mistake. After every cut, run a metal file along the edge to knock down burrs. Sandpaper (80 to 220 grit) finishes the job. A deburring tool, which looks like a small scraper, works even faster. Always secure your workpiece with clamps or a vise before cutting or drilling. Protecting hands and eyes during cutting means keeping your hands behind the blade and your face to the side. Work in a well-ventilated space, especially when painting or using adhesives. If you’re working indoors, open windows and use a fan to pull fumes outside.
Five essential PPE items for beginner metal projects:
Cut-resistant gloves (ANSI A4 to A6 rating). Safety goggles or full face shield. Respirator with P95/P100 filters or organic-vapor cartridge. Hearing protection (foam plugs or over-ear muffs). Work gloves for handling painted or primed pieces.
Safety training resources for beginners are available free through hardware stores (many offer weekend workshops), community makerspaces, and YouTube channels focused on metalworking basics. Even 20 minutes of watching proper technique will save you from common mistakes.
Simple Recycled Metal Materials to Gather for Garden Sculptures

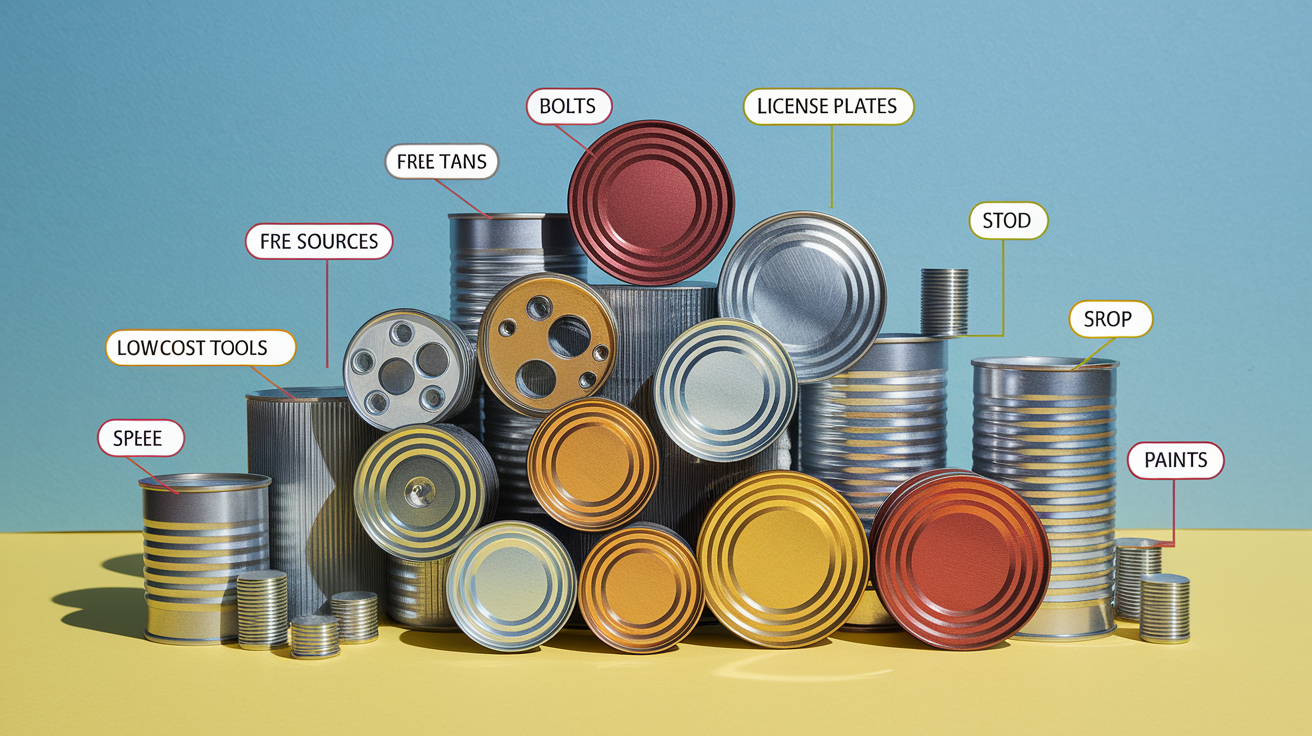
You don’t need to buy metal. It’s everywhere, and most of it’s free if you know where to look. Start in your own home. Tin cans from soup, beans, or coffee work perfectly for petals, body segments, and decorative layers. Plan to collect 3 to 10 cans per small project. Old flatware (spoons, forks, knives) bends into petals, leaves, or insect wings. You’ll use 4 to 10 pieces per sculpture depending on the design. Wire coat hangers supply stems, antennae, and armatures. One to three hangers per project is typical. Bicycle spokes, old hand tools, license plates, and small metal rods (a quarter-inch diameter, 12 to 24 inches long) all make great starting stock. Decorative add-ons like marbles, glass beads, or aquarium gravel attach with silicone adhesive and catch the light.
Choosing affordable scrap sources is easier than you think. Thrift stores sell flatware by the pound and often have bins of random metal objects. Flea markets and yard sales are goldmines for old tools, bike parts, and kitchen odds and ends. Curbside finds on trash day can include metal furniture frames, shelving brackets, and garden stakes. Municipal scrap yards let you walk the yard and pull small pieces for a few dollars per pound. Community swap events, church rummage sales, and online neighborhood groups (Nextdoor, Buy Nothing) regularly offer free scrap. Ask at local bike shops for bent spokes or discarded parts. Restaurants sometimes toss large cans that are perfect for bigger sculptures.
Seven sources for scrap metal and recycled materials:
Thrift stores (flatware, small tools, decorative metal objects). Flea markets and yard sales (license plates, bike parts, old hardware). Curbside trash days (metal shelving, furniture frames, garden stakes). Municipal scrap yards (sheet metal scraps, rods, small structural pieces). Community swap events and Buy Nothing groups. Local bike shops (bent spokes, old chains, handlebars). Restaurants and cafés (large cans, commercial kitchen discards).
Turning old bicycle parts into sculptures gives you curved tubes, spokes, gears, and chain for kinetic or abstract pieces. Converting kitchen utensils into outdoor art is one of the most popular beginner approaches because forks and spoons already have interesting shapes and everyone recognizes them. Repurposed tools into garden decor (wrenches, pliers, hammers) add an industrial or whimsical touch. The key is to see past the original use and notice shapes, curves, and how pieces might layer or connect.
Step-by-Step Instructions for Easy Scrap Metal Garden Sculptures

Every sculpture starts the same way, no matter what you’re making. Following a clear workflow keeps you from backtracking or wasting materials. You’ll move through prep, layout, cutting, assembly, finishing, and installation in order. Each step builds on the last, and skipping one usually means fixing problems later.
Ten-step process for building scrap metal art projects step-by-step:
- Collect your materials and lay them out on a work surface or drop cloth.
- Clean each piece by scrubbing with soap and water to remove dirt, grease, and loose paint.
- Remove rust and old finishes with a wire brush and 80 to 220 grit sandpaper.
- Plan your layout by arranging pieces on the ground or a table and taking a photo for reference.
- Measure and mark cutting lines, hole positions, and bend points with a permanent marker.
- Cut metal using tin snips or a hacksaw, working slowly and letting the tool do the work.
- Shape pieces with pliers, a hammer, or by bending over a block or dowel.
- Drill fastening holes where marked, starting with a small pilot bit and stepping up to final size.
- Dry-fit all parts together using clamps or wire to check alignment before final fastening.
- Fasten parts permanently using bolts, rivets, wire-wrapping, or epoxy as planned.
After assembly, file all sharp edges and sand rough spots. Then move on to priming, painting, and sealing. The dry-fit step in number 9 is the one beginners skip most often, and it’s the one that saves the most headaches. When you clamp or wire pieces together temporarily, you see exactly how they’ll look and whether holes line up. If something’s crooked, you adjust before glue sets or rivets go in.
Troubleshooting alignment comes down to patience and small fixes. If two holes don’t line up, drill a new hole or enlarge one slightly with a round file. If a piece wobbles, add a shim (a small scrap of metal or washers) to level it. If a design feels top-heavy, add weight at the base or shorten the stake. Measuring and marking metal accurately matters, but perfect isn’t the goal. Garden sculptures look better with a little asymmetry and handmade character. Cold connection techniques explained simply means you’re joining metal without heat, using mechanical fasteners or adhesives that cure at room temperature. These methods are strong enough for outdoor use and beginner-friendly because they don’t require special equipment or safety training beyond the basics.
Beginner Project: Tin-Can Flower Stakes Without Welding
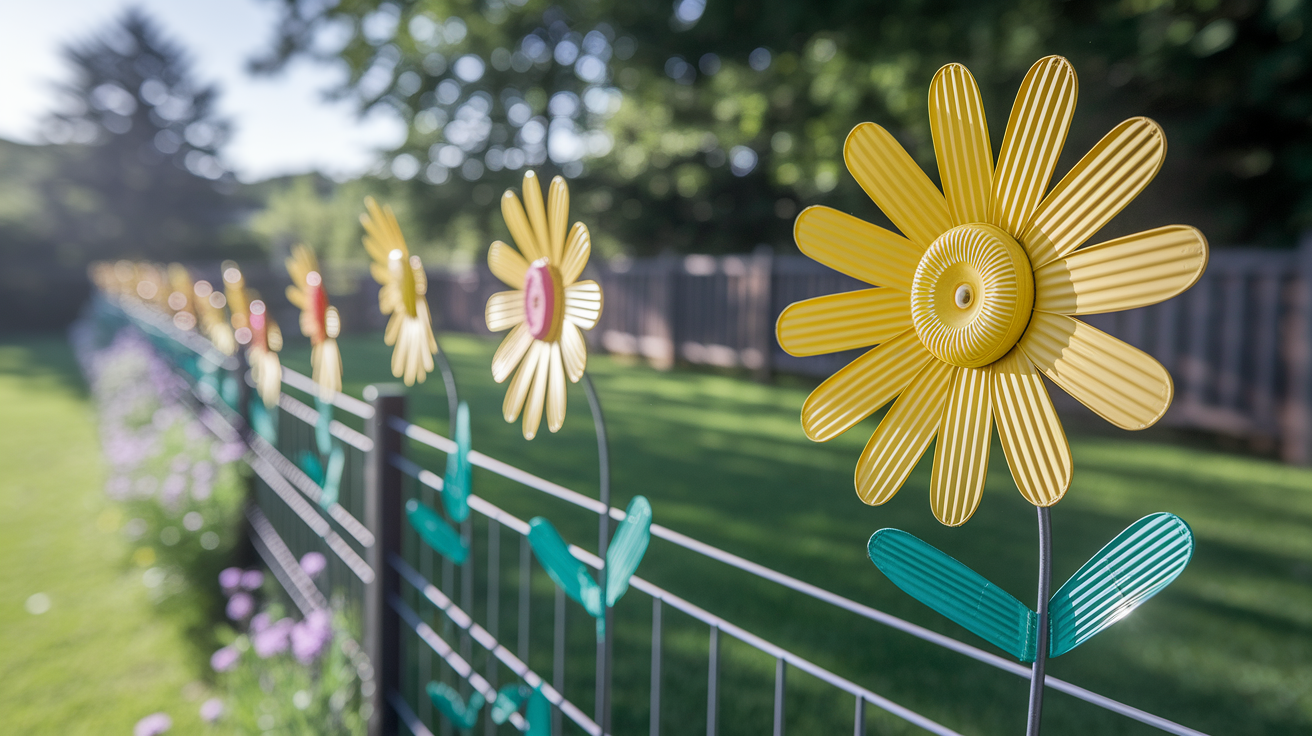
This project turns everyday soup or vegetable cans into cheerful flower stakes that look like oversized daisies or sunflowers. The petals are cut from the can walls, the center is a painted circle or bottle cap, and the stem is wire or a metal rod. Total time is 30 to 60 minutes per flower, and the cost is nearly zero if you already have paint and fasteners. These make great gifts and look especially nice clustered in groups of three or five along a fence line or in a flower bed.
Materials needed (per flower):
3 to 5 tin cans (any size, larger cans make bigger petals). 18 to 22 gauge wire or one coat hanger for the stem. One quarter-inch metal rod, 12 to 24 inches long, for staking. Small bottle cap or cut circle for the flower center. Two-part epoxy or silicone adhesive. Exterior spray paint (2 colors, one for petals, one for center).
Eight steps to build a tin-can flower stake:
- Remove labels from cans, wash thoroughly, and let dry completely.
- Use tin snips to cut the top and bottom off each can, then cut down one side to open the cylinder into a flat sheet.
- Draw petal shapes on the flat metal (5 to 8 petals per can) and cut them out with tin snips.
- File and sand all cut edges until smooth and safe to handle.
- Use pliers to gently curve each petal lengthwise to add dimension.
- Arrange petals in a circle, overlapping slightly at the base, and glue or rivet them together at the center.
- Attach the bottle cap or cut circle to the center with epoxy or a pop rivet.
- Wire or epoxy the flower head to the top of your stem, then wire or glue the stem to the quarter-inch stake.
Once assembled, spray the petals with one color (yellow, orange, pink, or white all work well) and the center with a contrasting color (brown, green, or a metallic). Let the paint dry completely, then apply 2 coats of clear outdoor topcoat to weatherproof the piece. The clear coat prevents rust and keeps colors bright through rain and sun.
Customizing colors is where these sculptures get fun. You can make spoon flower stakes tutorial versions by substituting bent spoons for the can petals. Paint them in pastels for a cottage garden look, or go bold with bright primary colors for a playful vibe. Mild steel projects for first-time makers benefit from using galvanized or stainless fasteners, which won’t rust and stain the paint. If you want to add texture, stipple the center with a stencil brush before the paint dries, or glue on aquarium gravel or small beads for a 3D effect.
Beginner Project: Weld-Free Metal Wind Spinner from Scrap Parts
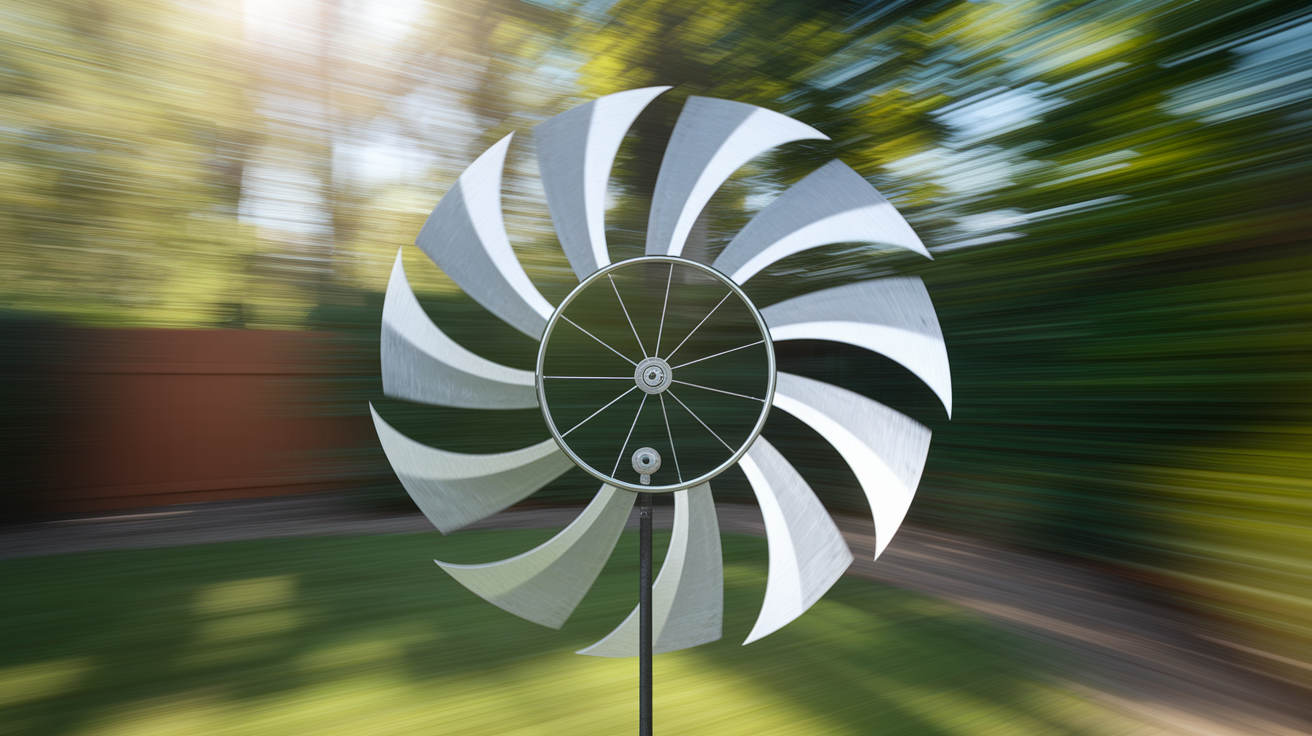
Wind spinners add movement and light to a garden. They catch the breeze, turn slowly, and create shifting reflections. This project uses a hubcap or any circular scrap metal as the main disc, a bicycle spoke or metal rod as the axle, and optional bearings to make rotation smoother. The design is forgiving because balance doesn’t have to be perfect. Slight wobbles add charm. Expect to spend 60 to 120 minutes on this project, and budget $10 to $20 if you’re buying a few fasteners and bearings.
Materials needed:
One hubcap or circular scrap metal piece (8 to 14 inches in diameter). One bicycle spoke or quarter-inch metal rod (12 to 18 inches long). Small ball bearing (optional, for smoother spin). Four to six bolts (quarter-inch) and washers for balance weights. Two-part epoxy or silicone adhesive. Rust-inhibiting primer. Exterior spray paint (metallic or bright solid colors work well).
Ten steps to build a wind spinner:
- Clean the hubcap or disc thoroughly and remove any rust with a wire brush and sandpaper.
- Mark the exact center of the disc and drill a hole sized to fit your spoke or rod snugly.
- Cut spiral shapes or curved blades from the outer edge of the disc using tin snips, leaving the center third intact for strength.
- Bend each blade slightly with pliers to create a twist that catches the wind (about 15 to 30 degrees).
- Insert the spoke or rod through the center hole and test-fit it to ensure it spins freely.
- If using a bearing, epoxy it into the center hole before inserting the rod.
- Add balance weights by bolting washers to the lighter side of the disc until it spins evenly.
- Prime all surfaces with rust-inhibiting primer and let dry.
- Apply 2 coats of exterior spray paint, letting each coat dry fully.
- Seal with 2 coats of clear outdoor topcoat, then mount the rod in the ground or attach it to a post.
Testing balance is the key to making kinetic yard art with bearings work smoothly. Hold the spinner by the rod and let it hang. If one side dips, that side’s heavier. Add small washers or bolts to the opposite side until it hangs level. Once balanced, the spinner will rotate in even the lightest breeze.
Tuning for movement means adjusting the blade angles and the friction at the pivot point. If the spinner doesn’t turn, increase the blade angle or reduce friction by sanding the rod and hole slightly. If it spins too fast and feels chaotic, reduce the blade angle or add a tiny bit of grease to the bearing. Forming spirals for yard ornaments can also be done by cutting the disc into a continuous coil from the outer edge to the center, then pulling it vertically to create a 3D helix. This version catches more wind and creates dramatic shadows. Assembling kinetic yard art with bearings makes the piece last longer and spin more reliably, but it’s not required. A simple rod through a hole will work if you keep the fit snug enough to stay in place but loose enough to allow rotation.
How to Prep, Prime, Paint, and Seal DIY Metal Sculptures

Proper surface prep is what separates sculptures that last a season from those that look good for years. Start by removing all rust, old paint, and grime. Use a wire brush to scrub the entire surface, working in small circles. Follow up with 80 to 220 grit sandpaper to smooth rough patches and create a slightly textured surface that helps primer stick. Wash the piece with soap and water, rinse thoroughly, and let it dry completely in the sun. Any moisture left behind will cause primer to bubble or peel. If you’re working with heavily rusted metal, treating corrosion on found metal with a rust converter product first will stabilize the surface before painting.
Preparing metal for painting and coating requires at least two coats of rust-inhibiting primer. Spray cans are the easiest option for most sculptures. Hold the can 10 to 12 inches from the surface and apply light, quick back-and-forth passes. Don’t try to cover in one coat. Thin layers dry faster and look smoother. Wait for the first coat to become dry to the touch (usually 20 to 30 minutes) before applying the second. For best results, spray the backside and all hidden areas too. Primer types for outdoor metalwork include dedicated rust-inhibiting formulas like Rust-Oleum Clean Metal Primer, which bonds to bare metal and blocks moisture. Once the primer’s fully dry (check the can for timing, usually 1 to 2 hours), apply your color coats using the same light, overlapping technique. One to two coats of exterior spray paint will cover most surfaces. Corrosion-resistant paint options include Rust-Oleum 2X Ultra Cover and similar outdoor-rated formulas.
Sealing is the final and most important step. Two coats of clear outdoor topcoat protect the paint and metal from UV rays, rain, and temperature swings. Outdoor sealants for longevity include Rust-Oleum Universal All Surface Clear Topcoat (offers UV protection), Rust-Oleum 2X Ultra Cover Matte Clear (fast-drying and non-yellowing), and Rust-Oleum Stops Rust Matte Clear Enamel (resists fading and chipping). Spray the first clear coat evenly across the entire piece, let it dry for 30 to 60 minutes, then apply the second coat. Don’t forget edges, seams, and the back. These areas are where moisture sneaks in. For a detailed walkthrough of priming and sealing outdoor metal, see How to Makeover Outdoor Metal Art – Easy DIY.
Four recommended product types for finishing metal sculptures:
Rust-inhibiting spray primer (Rust-Oleum Clean Metal Primer or equivalent). Exterior spray paint with built-in primer (Rust-Oleum 2X Ultra Cover or similar). Clear outdoor topcoat with UV protection (Rust-Oleum Universal or 2X Matte Clear). Silicone adhesive for sealing joints and attaching decorative elements.
Spraying technique makes a visible difference. Light coats prevent drips, sags, and bubbling. If you see a drip forming, stop and let that section dry, then sand it smooth and respray. Work in a well-ventilated area or outdoors on a calm day. Wind blows overspray and dust onto wet paint. Temperature matters too. Most spray paints work best between 50 and 85 degrees Fahrenheit. If it’s too cold, the paint goes on thick and takes forever to dry. If it’s too hot, it dries before it levels out and leaves a rough texture.
How to Place and Anchor Your DIY Garden Sculptures Outdoors
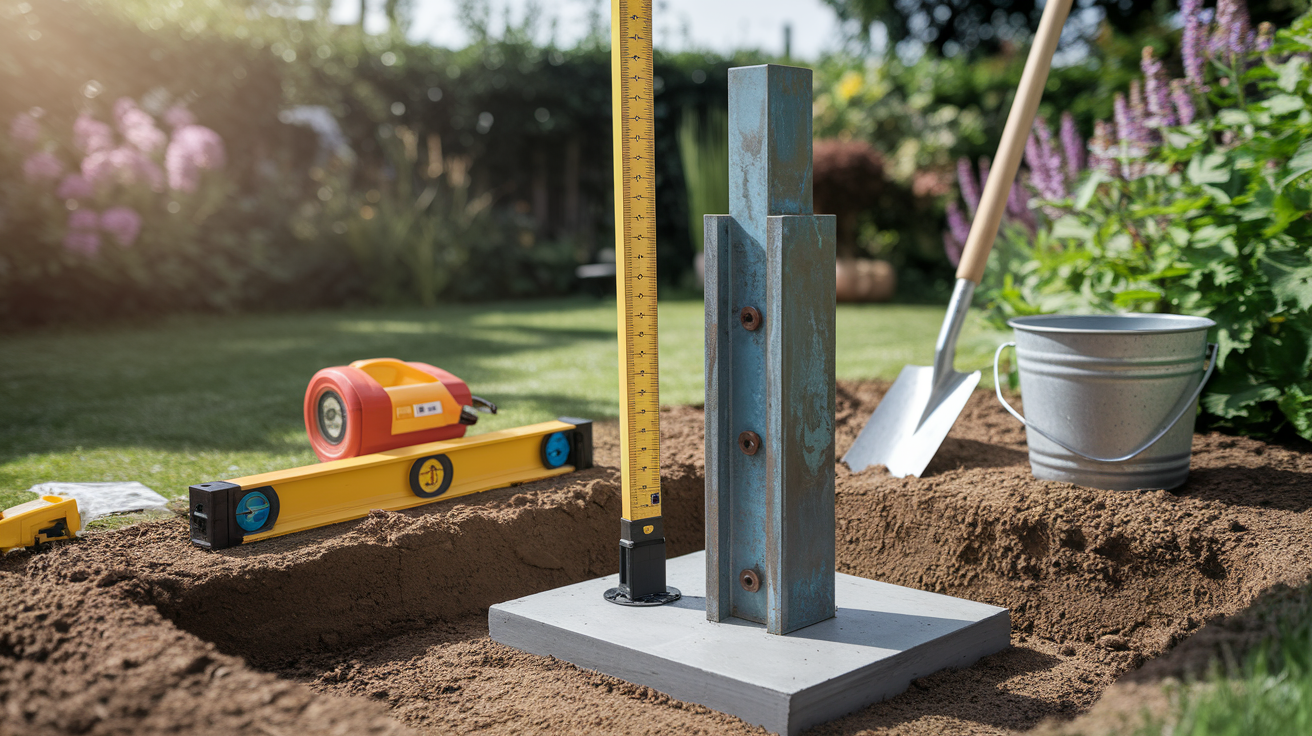
A beautiful sculpture isn’t much good if it tips over in the first storm or disappears into tall grass. Anchoring sculptures to lawns and soil starts with choosing the right method for your piece’s size and weight. Small flower stakes and lightweight decorations can be pushed 6 to 12 inches into soft soil with no extra support. For anything taller than 24 inches or top-heavy, stake it 24 to 48 inches deep. If the ground’s hard or rocky, pre-drill a pilot hole with a long metal rod or rebar, then insert your stake. Larger sculptures may need a concrete footing. Dig a hole 12 inches deep, set the stake in the center, fill with quick-set concrete mix, and brace it level while the concrete cures.
Mounting metal art on patios and walls requires different hardware depending on the surface. For wood fences or posts, use exterior-grade screws (number 8 by 1 inch stainless steel) driven into solid boards. Pre-drill pilot holes to prevent splitting. For brick or masonry, brick clips slide over the edge of a brick and hold lightweight pieces without drilling. For vinyl siding, use vinyl siding hooks that slip under a panel edge and support small decorations. For concrete patios or retaining walls, use masonry anchors or epoxy-set threaded rods. Always match the fastener to the weight of the sculpture. A 5-pound piece needs lighter hardware than a 20-pound piece.
Five anchoring methods for different placements:
Deep staking (24 to 48 inches) for tall or top-heavy sculptures in soil. Concrete footings for permanent, heavy pieces or sculptures in high-wind areas. Exterior screws into wood fences, posts, or shed walls. Brick clips or masonry anchors for brick, stone, or stucco walls. Weighted bases (concrete pavers, sandbags, or epoxied rocks) for portable garden sculptures for renters.
Portable options matter if you’re renting or if you like to rearrange your garden seasonally. Mount sculptures on heavy concrete pavers or flat rocks using epoxy, then move the whole base as needed. Sandbags or decorative stones stacked around a stake add stability without permanent installation. Creating balance and weight in designs means placing heavier elements low and central. If a sculpture feels tippy, widen the base, shorten the height, or add a counterweight.
Proper placement also affects how much you notice and enjoy the piece. Put sculptures where you’ll see them often. Near seating areas, along walkways, at the edge of flower beds, or framed by a window view. Avoid placing them where mowers, foot traffic, or garden hoses will knock them over. In windy spots, choose low-profile or kinetic designs that move with the breeze instead of fighting it.
Budget Tips for Sourcing Scrap and Tools for Metal Garden Art
Most beginner projects cost $5 to $30 in materials if you source scraps for free and buy only fasteners, primer, and paint. Your first tool investment will run $40 to $150 depending on what you already own and whether you buy new or used. After that, every project gets cheaper because you’re reusing tools and stockpiling scrap. The key to keeping costs low is to source before you shop. Spend a few weekends collecting materials, then design projects around what you have instead of buying specific items for a plan.
Finding parts at junkyards and swaps is one of the fastest ways to build a scrap pile. Municipal scrap yards and metal recyclers often have self-serve bins where you can pull small pieces for a dollar or two per pound. Auto salvage yards are goldmines for hubcaps, license plates, and brackets. Community swap events (often organized by libraries, environmental groups, or neighborhood associations) let you trade items or pick up free materials. Estate sales and farm auctions sometimes include bins of old tools, hardware, and misc metal that sell for almost nothing.
Five budget tips for keeping costs down:
Collect scrap for free from curbside trash, thrift stores, and community swaps before buying anything new. Buy tools used (pawn shops, garage sales, online marketplaces) and check community tool-lending libraries. Start with one or two small projects to learn techniques before investing in more tools or specialty fasteners. Stockpile fasteners by buying assorted hardware packs or loose bolts/rivets from the clearance bins at hardware stores. Use household items (soup cans, coat hangers, old flatware) for your first few projects to avoid any material cost.
Low-cost tools to start a metal hobby include buying a basic cordless drill for $40 to $75 used, tin snips for $10 to $25, and a metal file for $6 to $15. Skip specialty tools until you know you’ll use them regularly. A hacksaw works almost as well as a reciprocating saw for cutting small stock, and it costs $10. A budget breakdown for small projects typically includes $0 to $5 for scrap materials, $3 to $10 for fasteners (bolts, rivets, wire), $6 to $12 for primer, $4 to $10 for paint, and $8 to $15 for clear topcoat. That adds up to $21 to $52 per project if you’re buying everything, or as little as $5 if you already have paint and fasteners on hand.
Choosing affordable scrap sources also means asking friends, family, and neighbors. Someone cleaning out a garage or barn will often hand over old tools, cans, and wire for free just to clear space. Post a request on neighborhood social media or community boards. People love knowing their junk will become art instead of heading to a landfill.
Weatherproofing and Maintaining Recycled Metal Garden Sculptures
Even with good paint and sealant, outdoor metal needs occasional touch-ups. Plan to inspect your sculptures once a year, ideally in early spring before the growing season or in late fall after the garden winds down. Look for peeling paint, rust spots, loose fasteners, and cracks in adhesive joints. Catching small problems early means a 10-minute fix instead of repainting the whole piece. Weatherproofing seams and joints is especially important because that’s where moisture collects. Apply a bead of silicone adhesive or clear outdoor caulk along any seam that shows gaps or rust staining.
Rust converters and protective coatings can extend the life of pieces that are already showing corrosion. Rust converter is a liquid that chemically transforms rust into a stable black coating that you can prime and paint over. Brush it on, let it dry, then follow with primer and paint as usual. For pieces in very wet or salty environments (near a pool, coastal areas, or under roof drip lines), consider a marine-grade clear coat or an additional layer of paste wax applied once a year. Paste wax adds a sacrificial barrier that sheds water and can be reapplied without repainting.
Six maintenance actions to keep sculptures looking good:
Inspect annually for rust, peeling paint, loose fasteners, and damaged joints. Touch up paint and clear coat every 1 to 3 years depending on exposure and wear. Tighten bolts and replace any fasteners that show heavy corrosion. Clean sculptures with a soft brush and soapy water to remove dirt, pollen, and bird droppings. Apply silicone adhesive or outdoor caulk to any seams or joints that show gaps or rust. Store smaller pieces indoors or in a shed during winter if you live in a freeze-thaw climate.
Seasonal maintenance checklist for metal art doesn’t need to be complicated. In spring, wash off winter grime and check for damage. In summer, keep an eye on pieces in full sun for fading. In fall, do a full inspection and make repairs before cold weather. Winter storage suggestions apply mostly to pieces with delicate parts (kinetic spinners, anything with glued-on glass or beads). If you can’t store them, at least bring them under a roof overhang or wrap them loosely in a tarp to shed ice and snow.
Touch-up paint is easier if you keep leftover spray cans labeled by project. A quick spray over a small rust spot takes 5 minutes and prevents the problem from spreading. If a sculpture starts to look tired after a few years, you can always strip it down, sand it, and repaint in a new color. That’s the advantage of working with metal. It’s durable, and you can refresh it as many times as you want.
Final Words
Grab a few cans, snips, and a handful of simple tools. The guide walked you through no-weld ways to cut, bend, rivet, and wire pieces together so you can make outdoor-ready sculptures quickly.
You also got safety basics, where to find scrap, step-by-step builds like tin-can flowers and wind spinners, finishing tips for primer and paint, plus anchoring and budget ideas to keep projects cheap and sturdy.
Try one project this weekend. DIY recycled metal garden sculptures for beginners are low-cost, fast, and oddly satisfying. You’ll have a little yard art that holds up and makes you smile.
FAQ
Q: Why is recycled metal art a good choice for beginners?
A: Recycled metal art is a good choice for beginners because it’s cheap, forgiving, and uses simple tools; you’ll get quick wins with cans, flatware, or bike parts and learn basic cutting, shaping, and fastening fast.
Q: Do I need to weld to make garden sculptures?
A: You don’t need to weld to make garden sculptures; bolts, pop rivets, wire-wrapping, epoxy, and silicone let you join pieces quickly and safely with basic hand tools and no special training.
Q: What quick, low-cost projects should a novice try first?
A: Quick, low-cost projects for novices include tin-can flower stakes, spoon flowers, small bolt-and-washer trees, license plate birds, spiral wind spinners from hubcaps, and bike-spoke mobiles—each usually costs $5–$30 and takes 30–120 minutes.
Q: What basic tools should I buy to start making metal sculptures?
A: The basic tools you should buy to start are tin snips, pliers, a cordless drill, a pop rivet gun, a metal file, and clamps—most can be bought used or under $150 total for a usable starter kit.
Q: Which non-weld fastening methods work well for beginners?
A: Non-weld fastening methods that work well are pop rivets (3/16″), bolts (1/4″ or 3/8″), wire-wrapping (18–22 gauge), 2-part epoxy, and silicone adhesive for flexible outdoor joints.
Q: How do I prep, prime, paint, and seal outdoor metal sculptures?
A: To prep, prime, paint, and seal outdoor metal sculptures start with wire-brushing and 80–220 grit sanding, wash, apply two coats rust-inhibiting primer, one to two coats exterior spray paint, then two clear topcoat layers.
Q: How long and how much will a small project typically take and cost?
A: A small project typically takes 30–120 minutes and costs $5–$30, depending on materials; expect extra time for drying if you use epoxy or paint, or overnight for some adhesives.
Q: Where can I find affordable or free scrap metal and parts?
A: You can find affordable or free scrap metal at thrift stores, curbside picks, flea markets, municipal scrap yards, community swaps, and by repurposing old tools, utensils, license plates, or bike parts.
Q: What safety gear and precautions should beginners use?
A: The safety gear beginners should use includes cut‑resistant gloves (ANSI A4–A6), safety goggles, a P95/P100 respirator for grinding and appropriate mask for spray paint, and hearing protection; clamp pieces and deburr edges before handling.
Q: How should I anchor and place sculptures outdoors, especially in rentals?
A: You should anchor and place sculptures outdoors by staking 24–48″ into soil, screwing to wood, using brick clips for masonry, vinyl siding hooks, or weighted bases and pavers for renters to avoid permanent anchors.
Q: How do I maintain and protect recycled metal garden sculptures over time?
A: To maintain and protect recycled metal garden sculptures, inspect yearly, touch up paint and clear coat every 1–3 years, use rust converters on active corrosion, tighten fasteners, and reapply silicone at joints as needed.