


Think beautiful garden paths require pros and expensive supplies? Think again.
You can turn leftover tiles, a basic bag of concrete, and a free weekend into custom mosaic stepping stones.
This guide walks you through the simple steps of mold prep, mixing, tile layout, grouting, and sealing, and gives the small tricks that keep stones from cracking or looking muddy after the first rain.
You don’t need special tools, and most stones take one to two days of active work plus curing time.
Core Steps for Creating Mosaic Stepping Stones
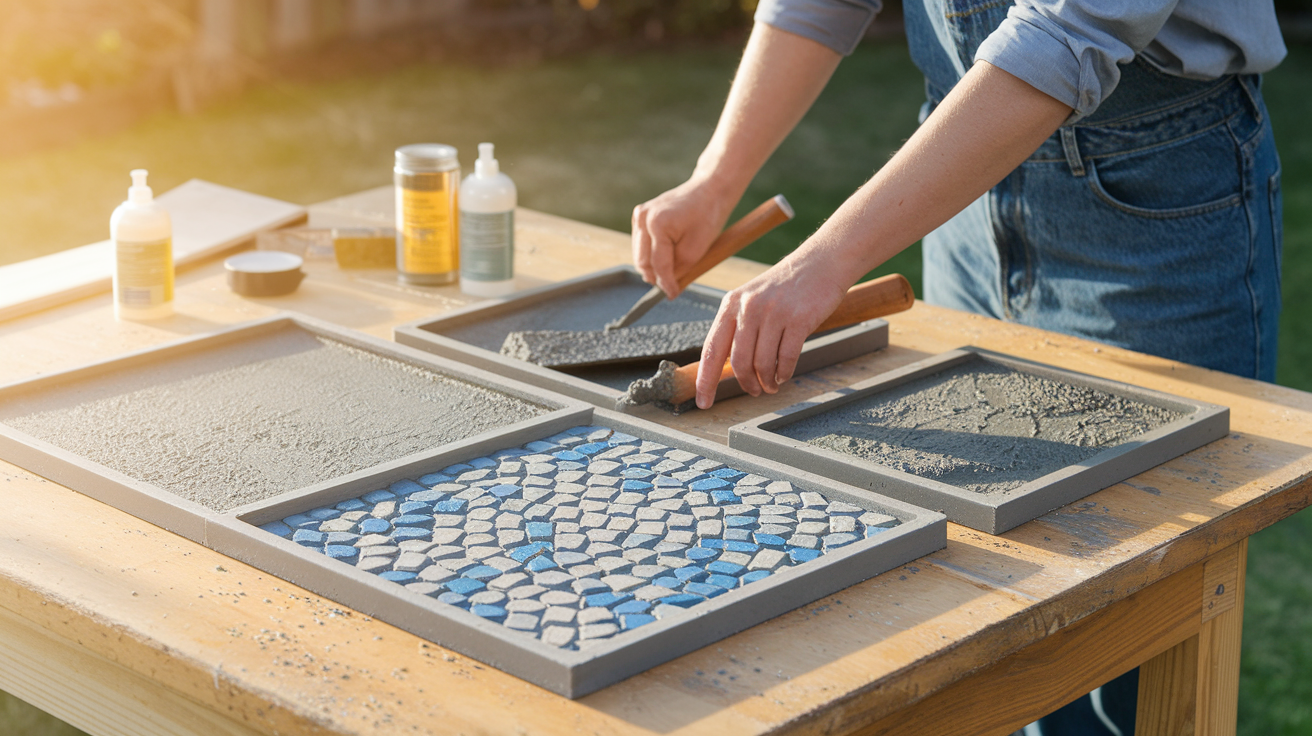
Mosaic stepping stones add personality to garden paths without needing advanced skills or specialty equipment. You can turn a weekend afternoon into a custom walkway using basic concrete, leftover tile pieces, and household mixing tools. The whole process flows from mold prep through concrete pouring, tile placement, and final sealing. Most of the waiting happens while the concrete cures on its own.
Deeper guidance on mixing ratios, mold setup, tile spacing, grouting technique, and sealer application appears in the sections below. Each stage has small tricks that make the difference between stones that last a decade and ones that crack the first winter.
- Prep mold with a release spray (cooking spray works fine).
- Mix concrete to a thick, scoopable consistency that holds its shape.
- Pour concrete into the mold to a depth of 1″ to 2″.
- Tap the mold sides and bottom with your hand or a rubber mallet to shake out air bubbles.
- Arrange tiles on top and press each piece lightly into the surface so it sinks about 1/8″.
- Cover the mold with plastic sheeting and let the concrete set for 24 to 48 hours in a shaded spot.
- Flip the mold, pop out the stone, and apply grout to fill the gaps between tiles.
- Once the grout cures (usually 24 to 72 hours), brush on one or two coats of outdoor concrete sealer.
Materials and Tools Needed for Mosaic Stepping Stones
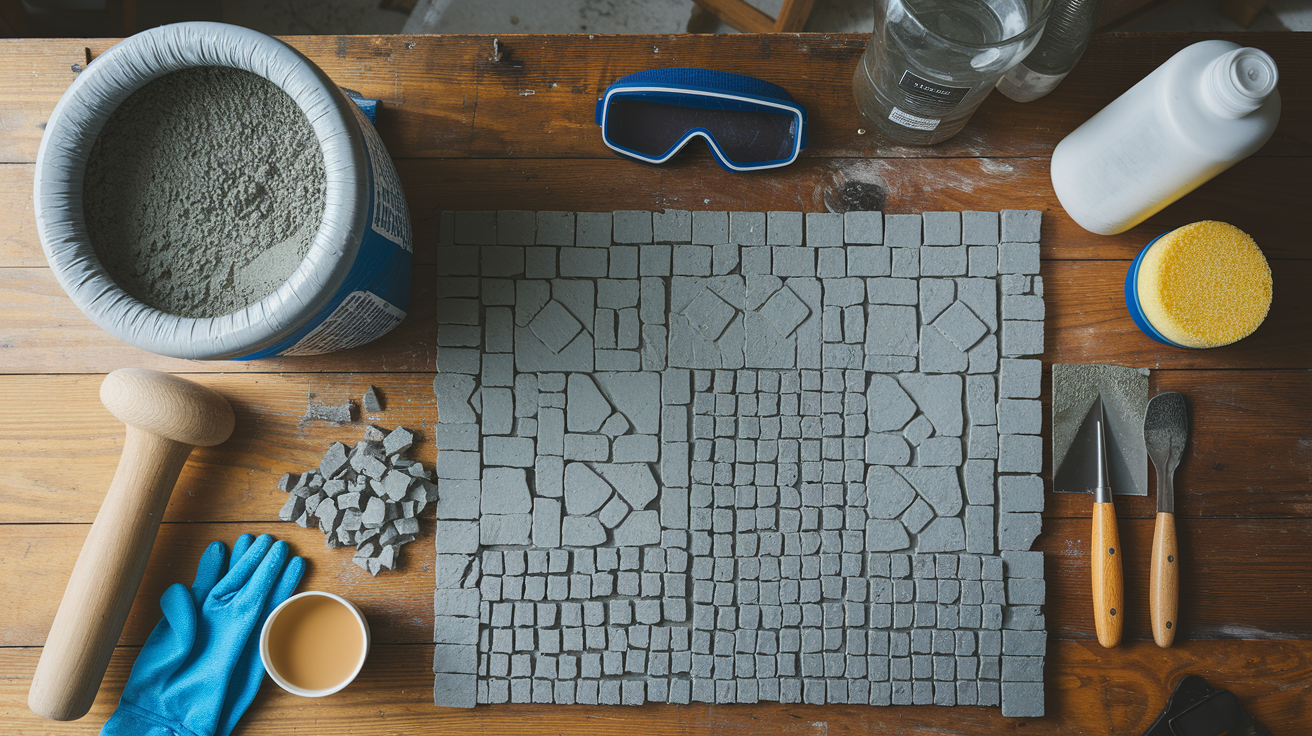
Each 12″ round stone uses roughly one pound of tile pieces. That’s about 100 to 200 small fragments depending on size. They pull from a shared 40 lb bag of concrete mix that costs $4 to $8 and yields three to four finished stones. Grout and adhesive run another $5 to $15 per container, and a bottle of outdoor sealer ($8 to $20) covers multiple stones with two coats. Molds cost $5 to $20 if you buy commercial plastic forms, but you can also reuse household trays, plant saucers, or build simple wooden frames for free.
Safety gear matters more than most people expect. Dry cement dust irritates lungs and skin, so wear an N95 respirator or better whenever you scoop powder. Add nitrile gloves and safety goggles during mixing and tile cutting. A margin trowel, putty knife, mixing bucket (5 gallon size), measuring cup, sponge, and old newspaper or a plastic drop cloth round out the essentials.
- Concrete mix: 40 lb bag of pre-mixed or rapid set concrete
- Mosaic pieces: ceramic tile, stained glass, broken china, pebbles, or marbles (about 1 lb per 12″ stone)
- Mold: plastic stepping stone mold, 12″ plant saucer, or wooden frame
- Grout: sanded outdoor grout for gaps wider than 1/8″; unsanded for narrower joints
- Sealer: exterior grade penetrating or acrylic concrete sealer
- Release agent: cooking spray, vegetable oil, or commercial mold release
- Tools: 5 gallon bucket, margin trowel, putty knife, rubber mallet, sponge
- Safety gear: N95 respirator, nitrile gloves, safety goggles
- Curing cover: plastic sheeting or large trash bag
- Tile nippers or wet saw: if you need to cut custom shapes
Choosing and Preparing Molds for Stepping Stones
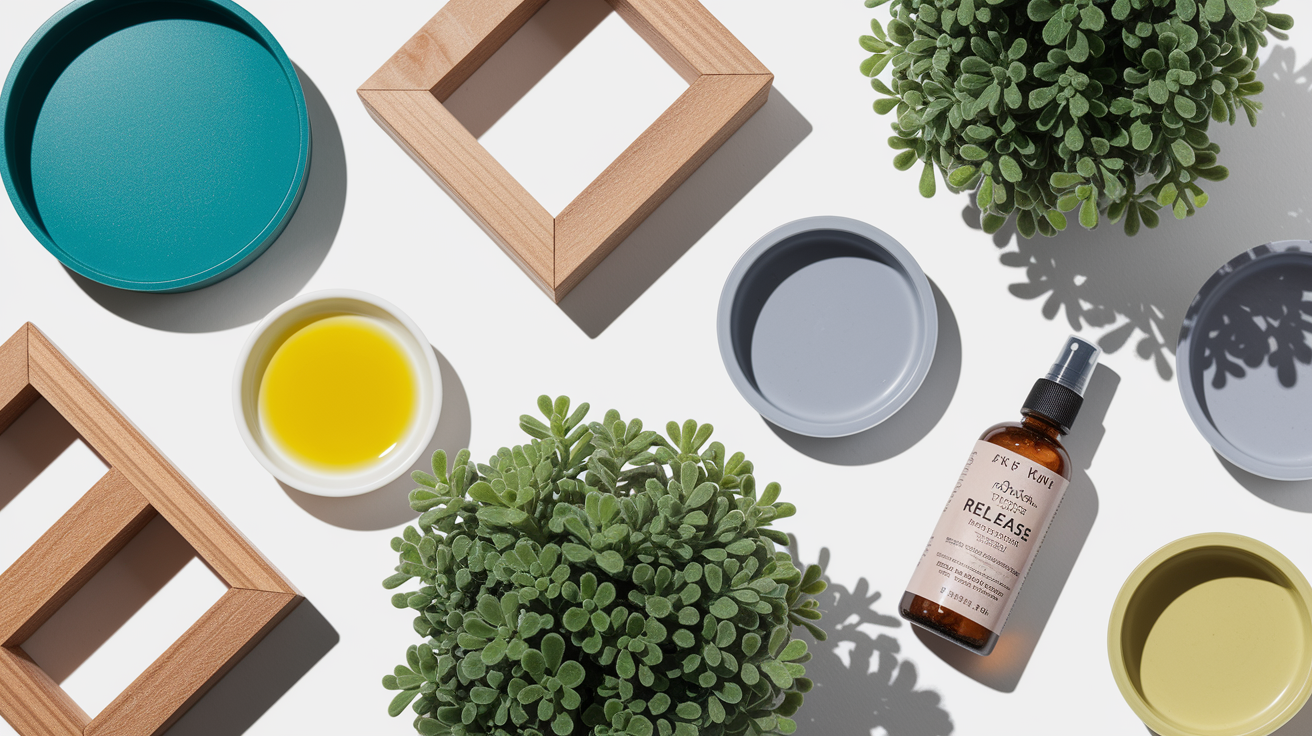
Molds define the final shape and size, so pick something that matches your path width and the stride length of whoever walks it most. Round molds in 8″, 12″, and 16″ diameters are easiest to find at hardware stores. Square and hexagon molds also work. If you skip the commercial mold, grab a sturdy plastic plant tray, a pie tin with straight sides, or build a simple frame from 2×4 lumber scraps and screw the corners together.
Before you pour, coat the inside surface with a light layer of cooking spray or rub it with a paper towel dipped in vegetable oil. That release layer lets you pop the cured stone out without prying or cracking edges. Set the mold on a flat, level surface covered with newspaper so the bottom cures smooth and you don’t glue your stone to the workbench.
| Mold Type | Typical Size | Notes |
|---|---|---|
| Commercial plastic round | 8″, 12″, 16″ | Reusable; smooth finish; about $5 to $20 |
| Plant saucer or tray | 10″ to 14″ | Free if you have one; check for drainage holes to plug |
| Wooden frame (DIY) | Custom square or rectangle | Screw 2×4 or 1×6 boards into a box; line with plastic if wood is rough |
Mixing and Pouring Concrete for Garden Mosaic Stones
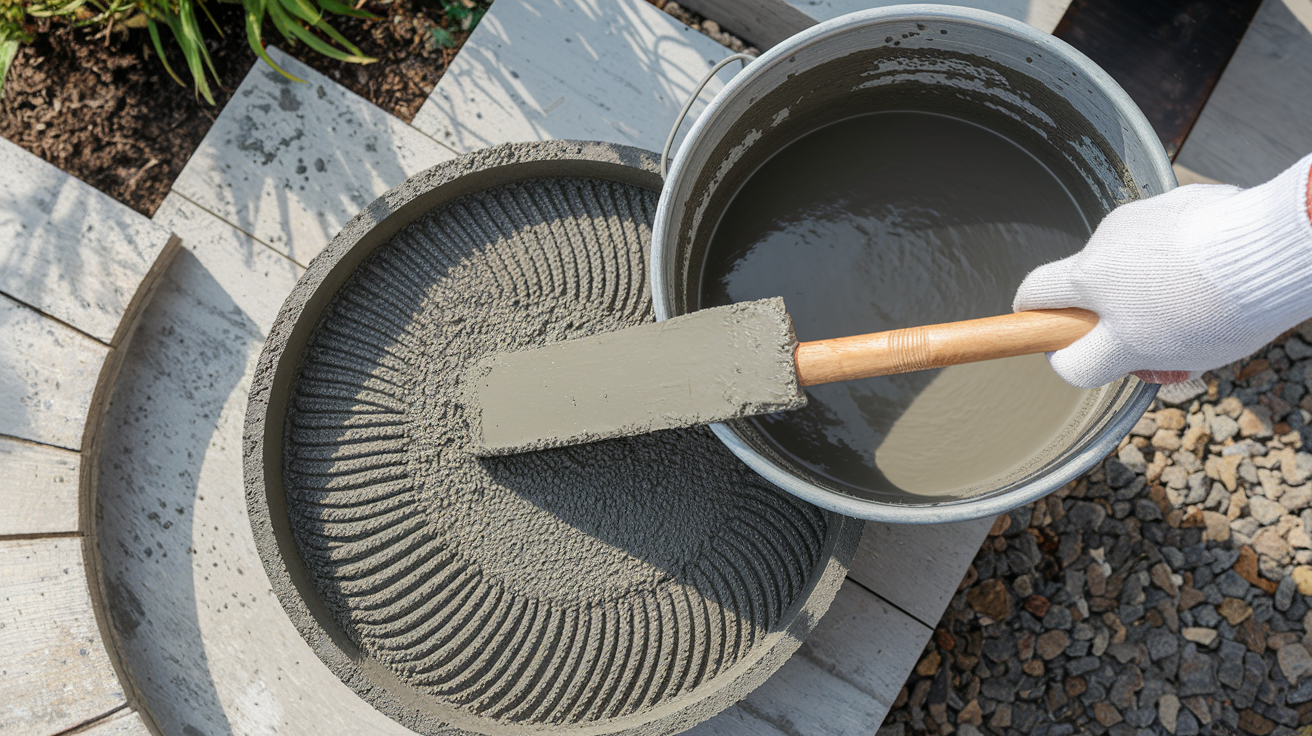
Start with about four cups (roughly one quart or just under a liter) of water in a five gallon bucket, then dump in the 40 lb bag of pre-mixed concrete and stir with a margin trowel or a sturdy stick. Add water a few tablespoons at a time if the mix looks crumbly. You want a thick consistency that holds a peak when you scoop it but spreads smoothly when you press down. If it sloshes like soup, you added too much water and the stone will cure weak and porous.
Pour the mixed concrete into your prepared mold until it reaches 1″ to 2″ deep, depending on how hefty you want the final stone. Thicker stones (closer to 2″) handle foot traffic better and crack less in freeze thaw cycles. But they also weigh more and use more material. After pouring, grab the mold by the edges and give it a few firm taps against your work surface or rap the sides with a rubber mallet to shake trapped air bubbles to the top.
One 40 lb bag yields about three to four stones if you pour them 12″ wide and 1.5″ thick. Smaller 8″ stones stretch the bag to five or six. Chunky 16″ × 2″ stones may only give you two per bag.
- Pour roughly four cups of water into a clean five gallon bucket.
- Add the entire 40 lb bag of concrete mix.
- Stir with a trowel until no dry pockets remain; add water sparingly if needed.
- Scoop concrete into the mold to your target depth (1″ to 2″).
- Tap or shake the mold to release air pockets, then smooth the top with the trowel.
Designing and Arranging Mosaic Patterns

Plan your design on paper first so you know roughly how many tiles to cut and which colors go where. A 12″ stone typically holds 100 to 200 small tile pieces when you space them with 1/8″ to 3/16″ grout lines. Larger 1″ to 2″ tiles obviously need fewer pieces to cover the same area. Sketch a simple radial pattern, a spiral, or a random scatter, then sort your tile stash by color into small containers so you can grab the right shade without digging.
Press each tile into the wet concrete until the top surface sits about 1/8″ to 1/4″ below the stone’s final level. That shallow recess gives grout a place to grip and keeps tiles from popping out when someone steps on an edge. If you’re using round marbles or smooth pebbles, push them in at least halfway so they lock into the cured concrete. Some people arrange tiles face down on a sheet of contact paper, then flip the whole design onto wet concrete and peel the paper away once the stone sets. This “reverse mosaic” method works great for intricate pictures or text.
Leave consistent spacing between pieces so grout can flow into the joints. Tiles touching each other look crowded and trap air pockets that weaken the grout bond. If a tile sinks too deep, pull it out, add a pinch of concrete underneath, and reset it level with the others.
- Radial sunburst: arrange tiles in wedges radiating from a center marble or large tile
- Random scatter: mix colors and sizes with no repeating pattern for a casual garden look
- Spiral or wave: lay tiles in a curving line from edge to center
- Checkerboard: alternate two colors in a grid (works best with square tiles)
- Border and center: ring the outer edge with one color, fill the middle with another
- Name or date inset: spell words with small letter tiles or number tiles pressed into one section
Grouting, Cleaning, and Finishing the Stepping Stones
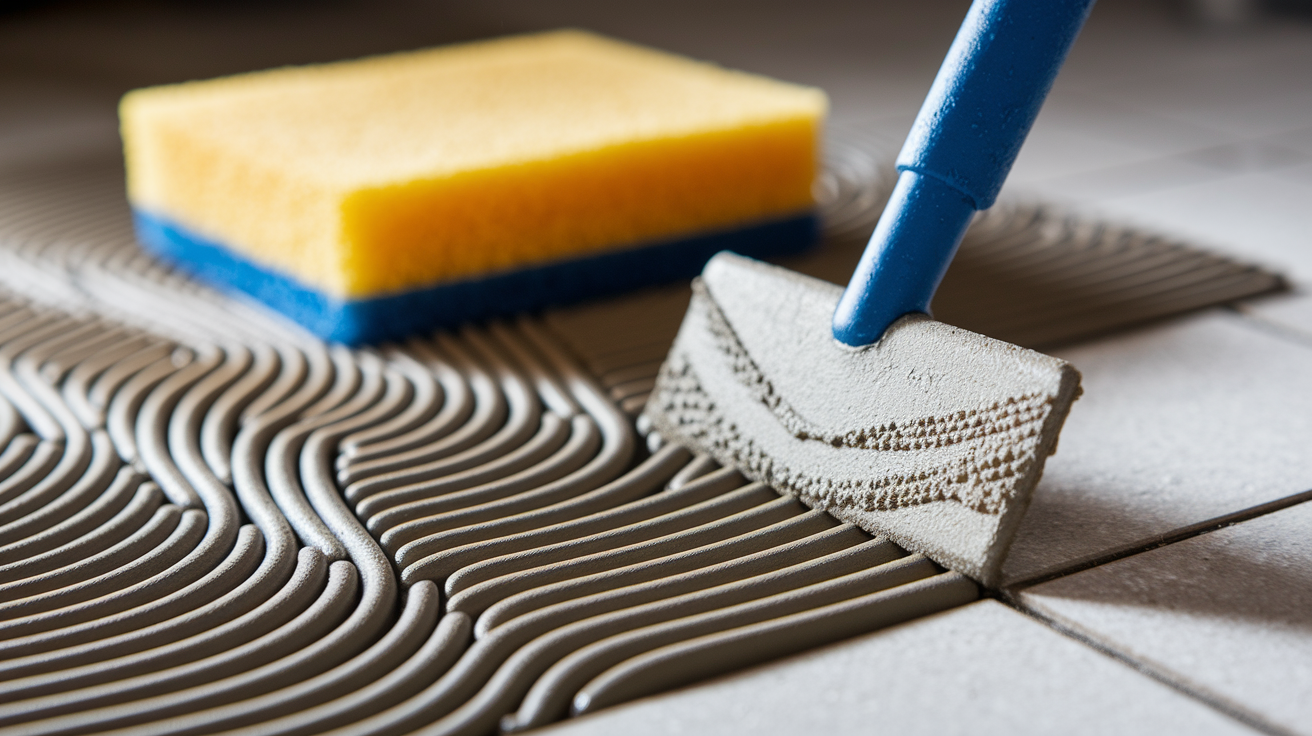
Wait until the concrete feels firm to the touch, usually 24 to 48 hours depending on temperature and humidity, before you apply grout. Outdoor stones need sanded grout if your gaps are wider than 1/8″, or unsanded grout for tighter joints. Polymer modified or epoxy grout handles freeze thaw cycles and moisture better than basic interior grout, so spend the extra few dollars if you live somewhere with cold winters.
Scoop grout onto the stone and spread it with a putty knife or rubber float, pressing firmly into every joint. Work in small circles to pack the grout down, then scrape off the excess by dragging the float at a diagonal across the tiles. Let the grout sit for 10 to 15 minutes until it starts to firm up (it will look hazy on the tile surface), then wipe the tiles with a damp sponge, rinsing the sponge frequently. Don’t flood the stone with water or you’ll wash pigment out of the grout and leave it blotchy.
Once the grout cures for the time listed on the bag (typically 24 to 72 hours), brush on a coat of outdoor concrete sealer. Let that coat dry for about 24 hours, then apply a second coat. The sealer keeps water from soaking in, which reduces freeze damage and makes the stone easier to clean. Plan to reapply sealer every one to three years depending on how much sun and foot traffic the stone gets.
- Mix grout according to package directions until it reaches a thick peanut butter consistency.
- Dump a generous scoop onto the stone and spread with a putty knife or float.
- Press grout into all joints, working in circular motions to get rid of air pockets.
- Scrape off excess grout with the float held at a 45° angle.
- Wait 10 to 15 minutes, then wipe tiles clean with a damp sponge; rinse sponge often.
- Let grout cure per label (24 to 72 hours), then apply two coats of outdoor sealer, allowing 24 hours between coats.
Installing Mosaic Stepping Stones in the Garden

Dig out a shallow bed slightly larger than the stone, about two to three inches deep if your soil drains well, or four to five inches if clay or heavy soil tends to pool water. Fill the hole with an inch or two of coarse sand or fine gravel, tamp it down by stepping on it, then set the stone on top and wiggle it until it sits level. Check with a short level or by eyeballing from a few feet away. A wobbly stone will crack when someone puts full weight on one edge.
Space stones 18″ to 24″ apart for a comfortable walking stride. Most adults cover about 24″ in a relaxed step, so closer spacing works for kids or decorative paths where you want people to slow down. Once the stones are placed, backfill around the edges with soil or mulch to lock them in place and hide the sand base.
- Mark layout: use a garden hose or spray paint to outline your path, then measure and mark stone positions with stakes or flour
- Excavate beds: dig each spot 2 to 3″ deep; compact the bottom with your foot
- Add base layer: pour 1 to 2″ of sand or fine gravel and tamp it level
- Set and level stones: place each stone, check for level, adjust sand as needed, then backfill edges with soil
Care, Cleaning, and Seasonal Maintenance for Mosaic Stones
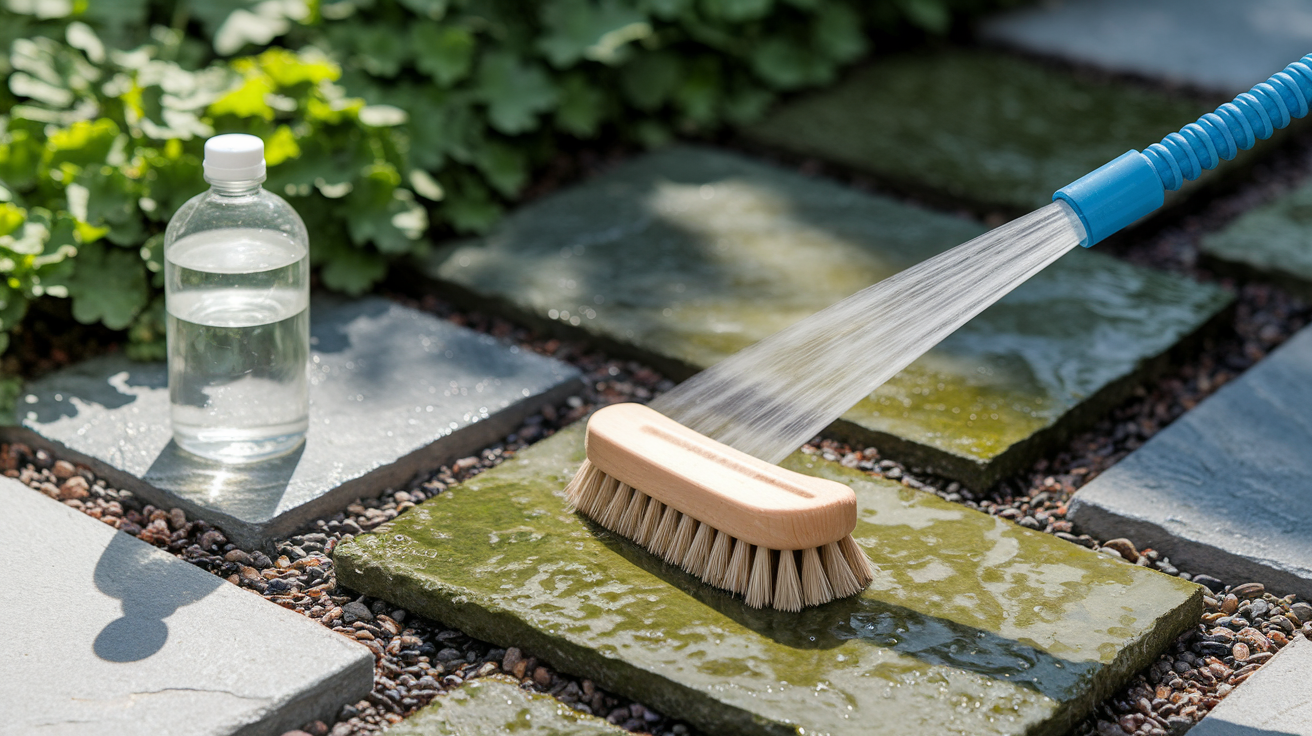
Hose off the stones a few times a year or scrub them with a soft brush and a bucket of water mixed with a squirt of dish soap when dirt builds up. Skip the pressure washer. It can blast grout out of the joints and crack thin tiles. If you notice moss or algae growing in shady spots, mix one part white vinegar to three parts water and scrub with a stiff brush, then rinse thoroughly.
Reseal every one to three years depending on how much the finish has worn. You’ll know it’s time when water stops beading on the surface and starts soaking in. Before winter arrives in cold climates, check grout lines for cracks and fill them with a small dab of matching grout so water can’t seep in and expand when it freezes. Avoid scattering rock salt or de-icing chemicals directly on the stones. They eat away at both grout and sealer.
- Hose or scrub with mild soap a few times per year
- Treat moss or algae with diluted vinegar (1:3 vinegar to water)
- Reseal when water no longer beads on the surface (every 1 to 3 years)
- Patch cracked grout before winter to prevent freeze damage
- Keep de-icing salts off the stones; use sand for traction instead
Budgeting and Cost Estimates for DIY Mosaic Stones

Material costs per stone land somewhere between $5 and $25 depending on whether you salvage tile from a ReStore or buy specialty glass pieces. The mold itself runs $5 to $20 if you purchase one, but that’s a one time expense you’ll reuse across every stone in your project. Concrete is the cheapest part. A $6 bag yields three to four 12″ stones, so figure about $1.50 to $2 per stone just for the mix.
Grout and sealer get shared across multiple stones. A small tub of grout ($5 to $10) handles four to six stones, and an eight ounce bottle of sealer ($8 to $15) covers a dozen or more with two coats. The wild card is tile cost. Broken china from your cupboard costs nothing, a sheet of ceramic mosaic tile runs $3 to $8, and artisan stained glass can hit $15 per square foot. Thrift stores, yard sales, and salvage shops keep costs low if you’re patient.
| Item | Typical Cost | Notes |
|---|---|---|
| 40 lb concrete bag | $4 to $8 | Yields 3 to 4 stones at 12″ × 1.5″ |
| Tile or glass pieces | $0 to $15 per stone | Salvaged china is free; specialty glass costs more |
| Grout (small tub) | $5 to $10 | Covers 4 to 6 stones |
| Sealer (8 oz bottle) | $8 to $15 | Two coats on 10+ stones |
Troubleshooting Common Problems When Making Mosaic Stepping Stones

Cracks usually come from too much water in the mix or from freezing temperatures during the first 48 hours of curing. If you see a crack after demolding, you can still use the stone for a low traffic spot, or fill the crack with a bead of exterior grade adhesive caulk. To prevent cracks in the next batch, stiffen your mix by using less water and keep newly poured stones indoors or covered if frost is forecast.
Tiles that pop out after grouting mean they weren’t pressed deep enough into the wet concrete or the concrete was too dry when you placed them. Glue loose tiles back down with a dab of exterior tile adhesive (thinset), let it cure overnight, then regrout the joint. Grout that looks blotchy or discolored often means you used too much water when wiping, or moisture is wicking up from below. Let the stone dry completely in the sun for a few days, then reseal to lock out moisture.
- Concrete won’t release from mold: you skipped the release spray. Warm the mold gently with a hair dryer and flex the edges, or soak in warm water for a few minutes
- Surface cracks during curing: mix was too wet or stone froze. Keep future pours indoors until firm, and use less water
- Tiles sink unevenly: concrete was too soupy or you pressed too hard. Aim for stiffer mix and lighter touch next time
- Grout crumbles out of joints: grout was too dry when applied, or you didn’t pack it in. Remix to proper consistency and press firmly with the float
- White haze on tiles after grouting: grout residue left too long. Scrub with a mix of one part vinegar to four parts water, then rinse
- Tiles pop out after install: not embedded deeply enough. Reattach with thinset, let cure 24 hours, then regrout the joint
Final Words
You’ve got a compact, step-by-step plan: gather molds and tiles, mix and pour concrete, press tiles, let set, demold, grout, seal, and install. The post also covers tool lists, mold options, pattern ideas, and a simple budget so a beginner can get started fast.
Later sections drill into mixing ratios, demold and cure times, grouting techniques, sealer choice, and winter care. If you want to know how to make mosaic stepping stones for garden, follow the steps and expect a single stone to take a weekend from start to finish. Enjoy the process and the new little path you’ll have.
FAQ
Q: How to make mosaic stepping stones for the garden?
A: Making mosaic stepping stones for the garden involves prepping a mold, pouring 1″–2″ of mixed concrete, pressing tiles into the surface, letting set 24–48 hours, then grouting and sealing.
Q: What is the best backing for outdoor mosaics?
A: The best backing for outdoor mosaics is a rigid, weatherproof base like poured concrete, cement board, or an outdoor-rated mortar bed that resists frost, movement, and moisture to keep tiles secure.
Q: What is the best concrete mix for mosaic stepping stones?
A: The best concrete mix for mosaic stepping stones is a standard 40 lb ready-mix or quick-set mix, mixed to a thick, workable texture—about 4 cups water per 40 lb bag for typical consistency.
Q: Is it cheaper to make stepping stones or buy them?
A: Making stepping stones is usually cheaper per stone—about $5–$25 DIY—especially if you reuse molds and source tiles cheaply, though your time and any needed tools raise the true cost.