

Throwing old t-shirts away is basically tossing easy style you already own.
In less than an hour a plain tee can become a fitted tank, breezy crop, or a bold cutout, often with no sewing at all.
This post walks you through the fastest, foolproof ways to refashion shirts using simple cuts, a few tools, and tricks that work in real homes (kids, pets, and all).
You’ll get step-by-step how-tos, quick fixes, and what to watch for so you can make new tops today.
Fastest Ways to Transform Old T-Shirts into Stylish New Tops
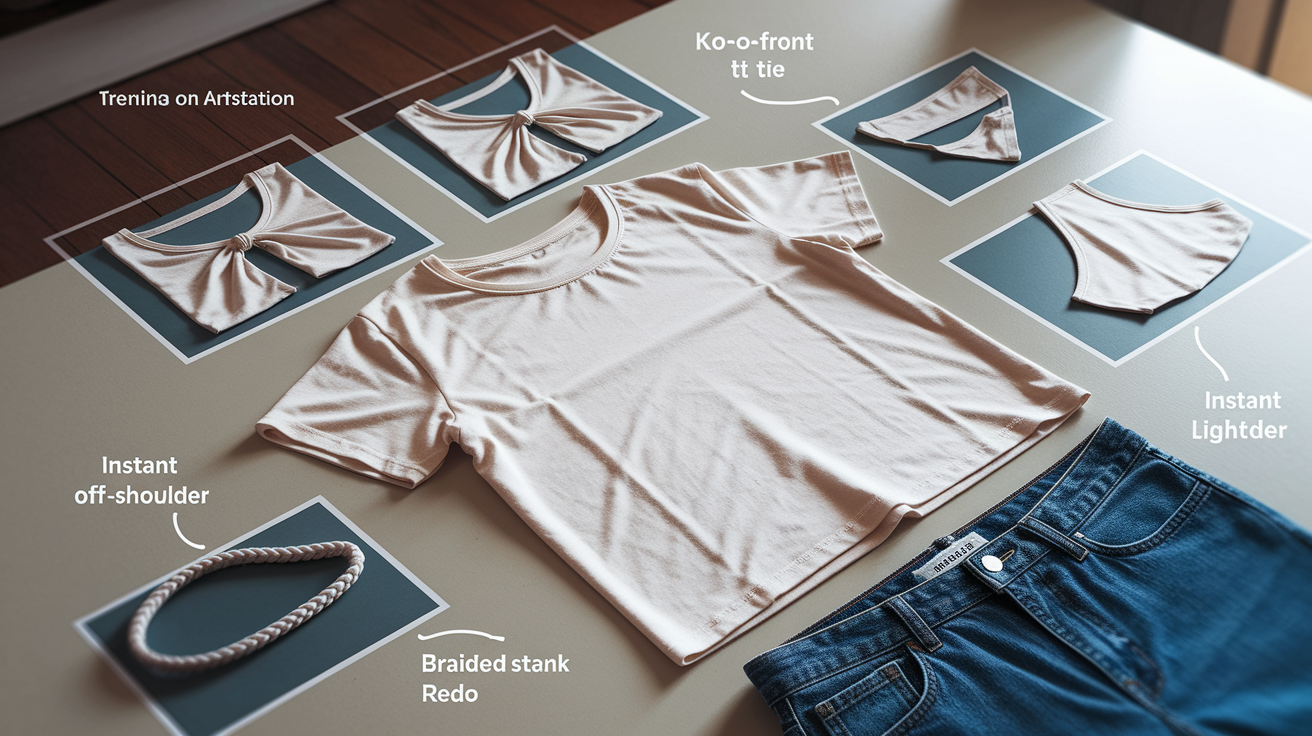
Your plain cotton tees can turn into fitted tanks, breezy cropped tops, or statement cutout pieces in less than an hour. These transformations use simple cuts and no-sew folds, perfect for Saturday mornings when you want visible results before lunch.
Start with a basic crop. Measure from the collar down to where you want the new hem, mark with a pin on each side seam, then cut straight across. A knotted front turns an oversized men’s tee into a casual fitted style. Just gather fabric at your natural waist, twist it once, and tie a simple knot. For instant drama, try a cutout back by folding the shirt in half lengthwise, sketching a shape (heart, triangle, or keyhole) on one side of the back panel, and cutting through both layers at once so the design stays centered.
Check out the Cutting Techniques section below for precision tips on symmetry, measuring, and template use. Those methods give you clean edges and matching sides, which matter most on visible cuts like necklines and armholes.
Six Rapid Transformations:
- No-Sew Crop – Cut straight across at your preferred length, let the raw jersey edge curl naturally.
- Knot-Front Tie – Gather fabric at the hem or waist, twist once, secure with a simple overhand knot.
- Cutout Back – Fold the shirt, trace a shape on the back panel, cut through both layers for a mirrored opening.
- Instant Off-Shoulder – Slice the neckband away in a gentle curve across the collarbone, stretch the raw edge to finish.
- Braided Strap Redo – Remove shoulder seams, cut straps into three narrow strips each, braid them, re-attach at the original shoulder points.
- Basic Tank Shift – Remove sleeves along the seam line, widen the neckline slightly, leave the edges raw or topstitch if you prefer a cleaner look.
Tools and Materials Needed to Upcycle Old T-Shirts into New Tops

Sharp fabric scissors prevent jagged edges that fray or curl unevenly, especially when you’re cutting jersey knit in one smooth pass. A rotary cutter and self-healing mat speed up straight cuts like hem lines and strip widths. Fabric markers or tailor’s chalk let you sketch cutouts, necklines, or placement guides directly on the shirt without permanent marks.
Most refashions need a sewing machine with a stretch or zig-zag stitch. Both settings work with the natural give in knit fabric and prevent skipped stitches or thread breaks. Use a size 80/12 universal needle for general projects. Switch to a ball point needle if you notice skipped stitches on thicker jersey. Lay out a clear workspace with good lighting, keep pins within arm’s reach, and press seams with a warm iron (no steam on synthetics) to set topstitching and hems flat before you move to the next step.
Required and Optional Supplies:
- Sharp fabric scissors or rotary cutter and mat
- Fabric markers, tailor’s chalk, or washable pens
- Sewing machine with stretch or zig-zag stitch capability
- Universal needle (80/12) and ball point needle (for stubborn knits)
- All-purpose thread in matching or contrast colors
- Straight pins, safety pins, hand-sewing needles
- Ruler or measuring tape for length and width checks
- Optional: elastic (¼ inch for casings), bias tape or strips for edge finishing, interfacing for appliqué stability, serger for professional-looking seam finishes
Cutting Techniques to Convert Old T-Shirts into Trendy Tops
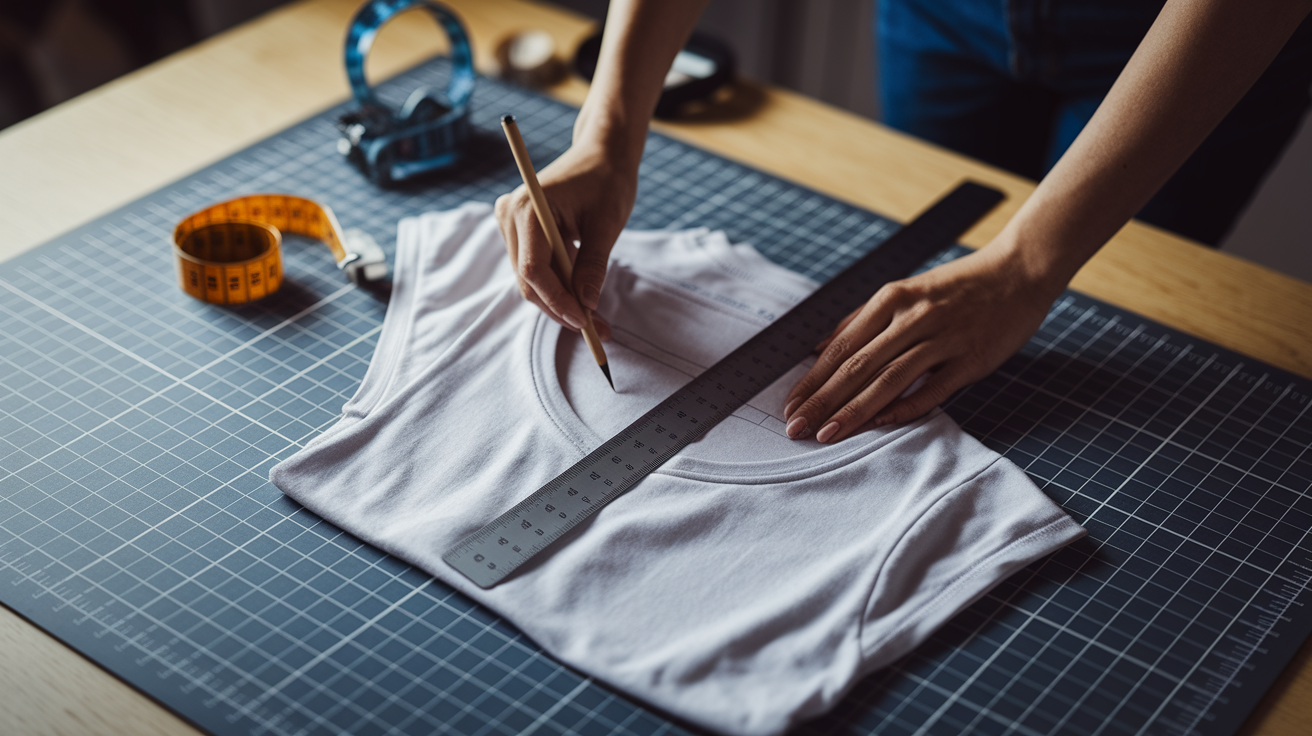
Measure twice and mark once. Use a measuring tape to find your desired crop length, shoulder width, or neckline depth, then transfer those measurements to the fabric with small chalk dots at each side seam. Connect the dots with a ruler for straight cuts. Or freehand a gentle curve for off-shoulder and scoop necklines. Just keep the curve shallow so it doesn’t gape when you move.
Fold the shirt in half lengthwise, align the side seams and shoulder seams perfectly, and pin the layers together before you cut. This folding trick means both halves of a cutout, armhole, or neckline match exactly. If you’re nervous about freehand shapes, trace a template onto paper first. Use a dinner plate for wide curves, a mug for tighter arcs, or print a heart or geometric shape at the size you want and pin it to the fabric as a cutting guide.
Raw jersey edges curl and wave naturally, creating a casual rolled hem without extra sewing. If you prefer a clean, flat edge, add a small seam allowance (about ¼ inch) outside your marked line, then fold and topstitch after cutting. For structured details like color-blocking panels or added frills, cut exactly on the line and finish edges with a serger or zig-zag stitch before assembly.
| Cut Type | Use | Difficulty |
|---|---|---|
| Straight Crop | Shorten shirt length, create raw-edge hem | Beginner |
| Curved Neckline | Off-shoulder, scoop neck, wider collar | Beginner |
| Sleeve Removal | Tank tops, sleeveless styles, armhole reshaping | Beginner |
| Geometric Cutouts | Back panels, side vents, decorative openings | Intermediate |
| Tapered Strips | Shoulder frills, braided straps, tie closures | Intermediate |
Turn Old T-Shirts into Crop Tops and Tank Styles

A fitted camisole-style tank starts with an oversized tee. Remove the sleeves by cutting along the shoulder seam line, then deepen the armholes by trimming another inch toward the side seams so the openings sit flat against your ribs. Pin the side seams in by one to two inches on each side (depending on how much fabric you need to remove), try the shirt on inside-out to check the fit, then sew a straight seam down each side and trim the excess.
Gathered tanks skip the side-seam tailoring and rely on elastic or drawstring casings at the hem or waist to cinch loose fabric into soft gathers. After you remove the sleeves, measure around your torso where you want the gather to sit. Cut a piece of ¼ inch elastic to that measurement and create a casing by folding the raw hem edge over the elastic and topstitching close to the fold. Leave a small gap to adjust the elastic if needed, then close the gap once the gather looks even.
Scoop or V-necklines change the entire look of a basic tee without altering the body. Fold the shirt in half lengthwise, draw half of your desired neckline shape starting at the center front fold, and cut through both layers. Stretch the raw edge gently with your fingers to encourage the jersey to curl into a finished rolled edge. Or topstitch ¼ inch from the edge if you want a flatter, more controlled finish.
Basic Tank Conversion Workflow:
- Lay the shirt flat, measure and mark your new armhole depth on both sides (typically 1 to 2 inches deeper than the original sleeve seam).
- Cut away the sleeves, following your marked line and keeping the curve smooth.
- Try the shirt on to check fit and armhole placement, adjust the cut if needed.
- Finish raw edges with a zig-zag stitch or let them curl naturally for a relaxed raw-edge look.
Transform Old T-Shirts into Off-Shoulder, Cold-Shoulder, and Cutout Tops

These styles add visual interest and a bit of skin without losing the comfort of a tee. Each method relies on strategic cuts and simple finishes, and all three work best when you’ve already reviewed the measurement and folding techniques in the Cutting Techniques section.
Off-Shoulder Method
Cut the neckband and the top portion of the shoulders away in a gentle, wide curve that runs from armpit to armpit across your collarbone. The curve should dip about two inches below the original neckline at the center front, then rise smoothly back up at each shoulder. Once the fabric is removed, you’ll need to stabilize the new neckline so it stays in place and doesn’t stretch out.
Cut a bias strip about three inches wide and long enough to wrap around the entire new neckline plus seam allowance. Sew the short ends of the strip together to form a tube. Fold the top edge down about ½ inch and press. Then pin the tube to the raw neckline edge (right sides together) and stitch all the way around. Fold the tube over the seam allowance to the inside, topstitch close to the fold, and leave a two inch gap. Thread ¼ inch elastic through the gap (measure it to your upper-chest circumference first), join the elastic ends, and close the gap. This elastic casing holds the neckline snug against your skin.
Cold-Shoulder Cut
Remove the sleeves completely, then resize the bodice if the armholes gape. Finish both the armhole edges and the inner edges of the removed sleeves with bias strips or a narrow zig-zag stitch. Reattach the sleeves by pinning them back onto the shoulder area only (not the full armhole), leaving a gap between the top of the sleeve and the shoulder seam to expose skin. Topstitch the sleeve to the shoulder. Finish by joining the shoulder seam if you opened it during the process.
This style works well on shirts that are slightly oversized, giving you room to adjust the sleeve placement without the fabric pulling tight across your chest.
Cutout Design Options
Cutouts can be small (a single keyhole at the back neckline) or bold (a lattice of horizontal strips across the shoulders or down the spine). Fold the shirt to get symmetry, sketch your design lightly with chalk, and remember that jersey won’t fray, so raw edges are fine. For a woven or loosely knit cutout, topstitch around the opening with a zig-zag or decorative stitch to prevent unraveling.
Geometric shapes (triangles, diamonds, circles) look cleanest when traced from a template. Net overlays add texture without full exposure. Cut large circles from sheer net fabric, layer them over a cutout opening, and topstitch the periphery to secure the net while leaving the cutout visible underneath.
Multi-T-Shirt Refashioning: Creative Ways to Combine Old T-Shirts into New Tops
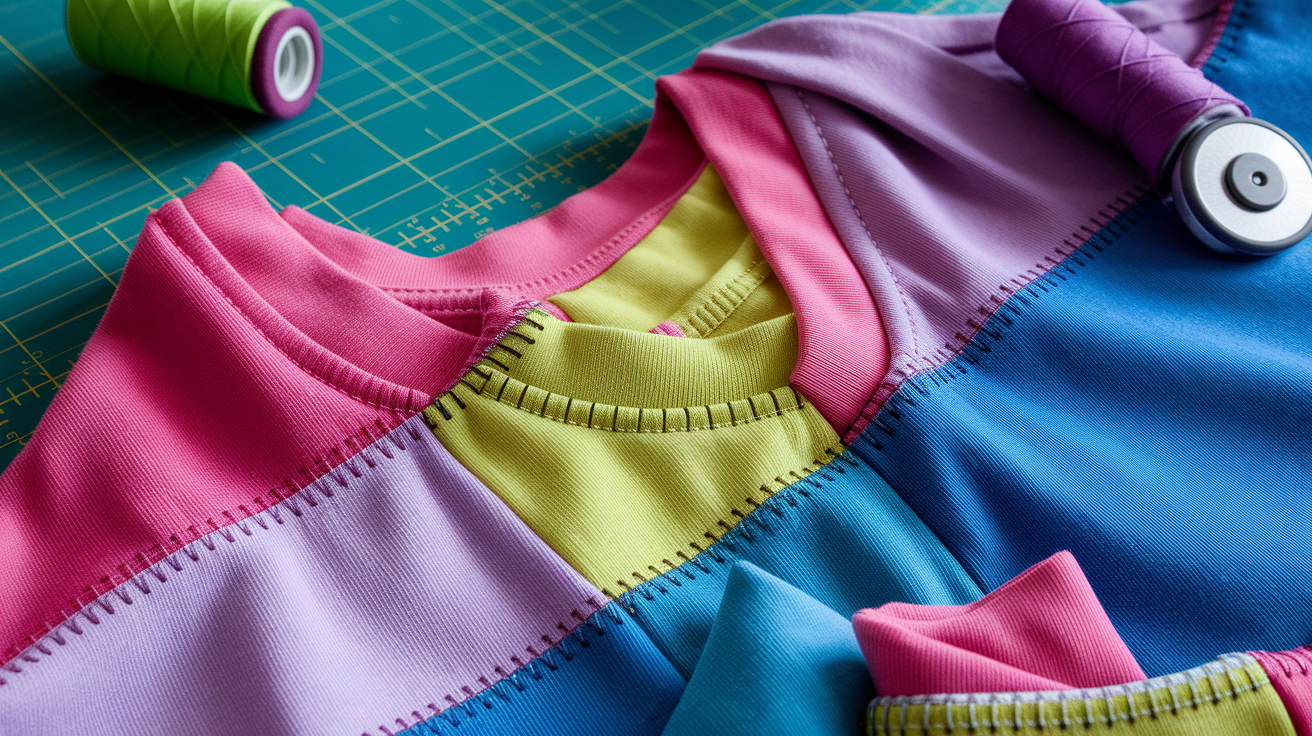
When one tee doesn’t give you the color, length, or design you want, combine two or more. Cut each shirt at strategic points (usually the natural waist, underarms, or neckline) and join contrasting panels to build new silhouettes like color-blocked tanks, layered bodices, or mixed-sleeve styles.
Color-blocking works by cutting one shirt horizontally at the waist and another shirt at the same point, then swapping the top and bottom halves. Pin the mismatched pieces right sides together, sew a straight seam across the join, and press the seam flat. If the two fabrics have different stretch levels, use a zig-zag or stretch stitch to keep the seam flexible. You can also add a third fabric as a narrow accent stripe between the two main panels. Just cut a strip two to three inches wide, fold the raw edges in, and topstitch it over the join seam.
Five Multi-Shirt Combination Ideas:
- Split two tees at the waist and swap halves for a two-tone color-block top.
- Remove sleeves from one shirt and replace them with sleeves cut from a contrasting tee (great for graphic-print bodies with solid sleeves).
- Cut a V-shaped panel from one shirt’s front and insert it into the neckline of another for a built-in contrasting bib.
- Layer a sheer or mesh tee over a solid base, trim the outer layer shorter or cut shapes from it, and topstitch the edges so both layers move as one.
- Combine child-sized tees into an adult gathered tank by cutting off the hems and sleeves, joining the bodies side by side, and gathering the top edge onto a narrow elastic casing.
Adding Embellishments When Refashioning Old T-Shirts into New Tops

Embellishments turn a simple refashion into a one-of-a-kind piece. Small details like flowers, trim, appliqué, and texture overlays give you a reason to keep wearing a shirt long after the novelty of the cut wears off.
Fabric flowers made from tee scraps add soft texture to necklines, shoulders, or hems. Cut circles in varying sizes (two to four inches in diameter), fold each circle’s edge inward in small pleats to form petals, and hand-sew the gathered center onto the shirt. Layer two or three flowers together for depth, or scatter single blooms across a shoulder or down one side seam.
Patch appliqué works best when you back the patch fabric with interfacing, especially if you’re using a printed scrap or adding embroidery on top. Cut your patch shape leaving about ½ inch of fabric around the design. Press interfacing to the back, pin the patch in place on the tee, and machine zig-zag stitch all the way around the edge. Trim any stray threads with sharp scissors so the appliqué looks clean and intentional.
Six Embellishment Types:
- Lace or net inserts – Cut panels from the shirt and replace them with sheer fabric, topstitching the edges.
- Denim fringe – Cut thin strips from old jeans and hand-sew them along hems or necklines for a boho edge.
- Beads and sequins – Hand-sew individual beads in clusters or lines for subtle sparkle.
- Shirring – Use elastic thread in the bobbin to create gathered, stretchy rows across the neckline, sleeves, or waist.
- Fabric collars – Cut a Peter Pan or pointed collar from contrasting fabric and topstitch it to the neckline.
- Net embellishment circles – Cut large circles from non-fraying net, layer them on the shirt, and topstitch the periphery to create sheer textured motifs.
Essential Sewing Techniques for Turning Old T-Shirts into New Tops
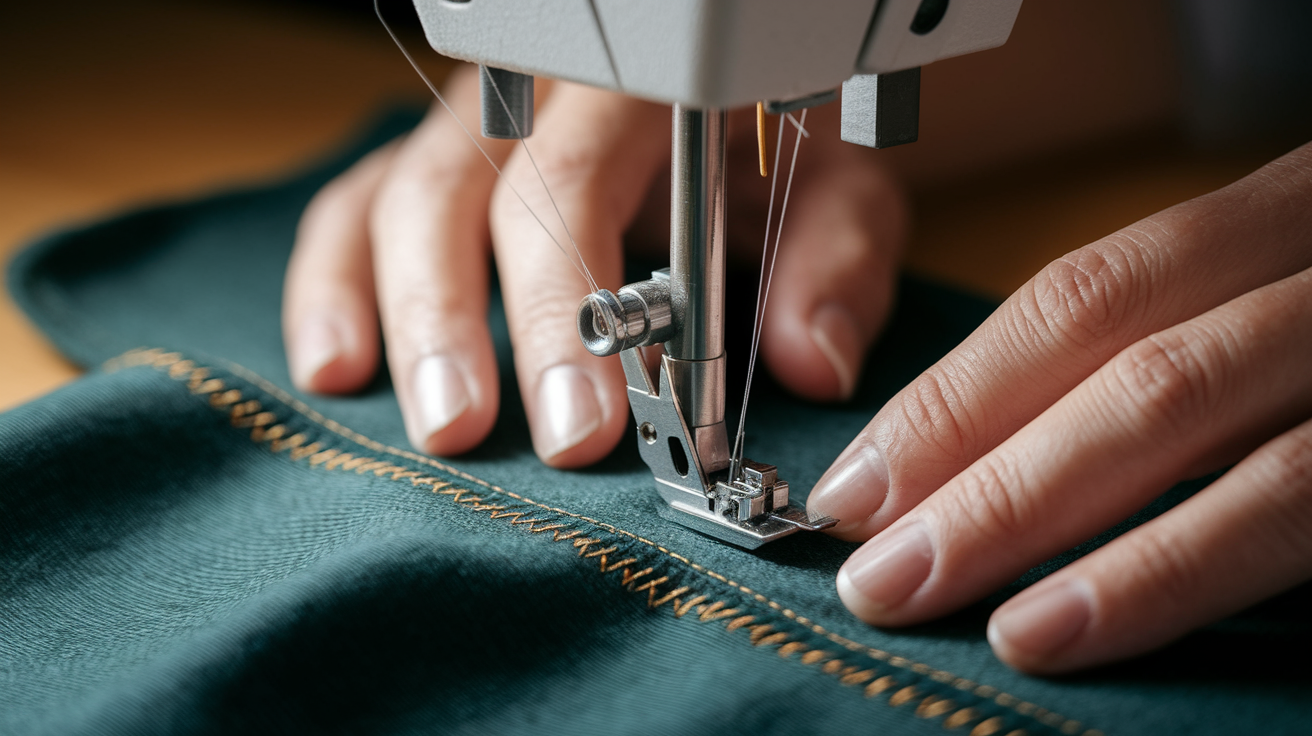
Knit fabric stretches, which is why it’s comfortable. But it also means your stitches need to stretch with it. Use a stretch stitch (looks like a lightning bolt on most machines) or a narrow zig-zag stitch for all seams and hems on jersey tees. Straight stitches will snap the first time you pull the shirt over your head. If stitches skip or the fabric puckers, switch to a ball point needle and lower your machine’s tension slightly.
Topstitching holds hems, necklines, and panel joins flat while adding a visible design line. Sew ¼ inch from the edge using a thread color that matches or contrasts intentionally. Matching thread disappears into the fabric for a subtle finish, while contrast thread (like white on black or bright yellow on gray) highlights the refashion details. Press seams with a warm iron before topstitching to get rid of waves and bunching.
Seam allowances on knit refashions can be narrow. ¼ inch is usually enough because jersey doesn’t fray. Finish raw seam edges with a serger if you have one, or run a zig-zag stitch along the edge to prevent rolling. When you need to take in side seams or resize a shirt, pin the new seam line while wearing the shirt inside-out, mark the line with chalk, remove the shirt, and sew just outside the marked line so you can adjust if the fit is too tight.
Gathering and Pleating
Gathering creates soft, even folds along a straight edge. Set your machine to the longest stitch length, sew two parallel rows of stitching ¼ inch apart without backstitching at either end. Then gently pull the bobbin threads while sliding the fabric along the thread to bunch it up. Pin the gathered edge to the flat piece (like attaching a frill to a shoulder or a ruffle to a hem), distribute the gathers evenly, and sew a regular-length stitch between the two gathering rows to lock everything in place.
Pleating gives you structured, crisp folds instead of soft gathers. Fold the fabric into evenly spaced accordion pleats (each fold typically ½ to 1 inch wide), pin each pleat in place, press with an iron to set the creases, then topstitch across the top edge to hold the pleats flat. Pleated cuffs and necklines add tailored detail to casual tees.
Hem & Neckline Finishes
Raw hems on jersey curl into a natural rolled edge. Just cut and go. If you want a flat hem, fold the raw edge under ¼ inch, press, then topstitch close to the fold with a stretch stitch. For hems that need extra hold (like a cropped waist that will sit snug against skin), fold the edge under twice to encase the raw fabric, press, and topstitch.
Neckline finishes can be raw, topstitched, or bound with bias tape. Bias tape (cut on the diagonal grain of woven fabric) stretches slightly and wraps around curves without puckering. Pin the tape to the raw neckline edge with right sides together, sew along the tape’s fold line, flip the tape to the inside, press, and topstitch from the outside to catch the tape’s inner edge. This method works for off-shoulder curves, deep V-necks, and armholes on cold-shoulder styles.
Final Words
Get to work: no-sew crops, knot-front tops, tanks, off-shoulder pieces, and simple cutouts turn old tees into wearable looks fast.
The guide shows instant outcomes so you can pick the project you want.
A few basic supplies, sharp scissors, a simple sewing kit or fabric glue, pins, and a tidy workspace cover most projects.
Follow the step-by-step pages for quick wins, and consult Cutting Techniques when you want cleaner, measured results.
If you want to refashion old t-shirts into new tops, try one idea this weekend and enjoy the new pieces you make.
FAQ
Q: How do I turn an old t-shirt into a crop top quickly?
A: Turning an old t-shirt into a crop top quickly means cutting it to the desired length, finishing the raw edge (knot, fold, or simple hem), and trying it on to check fit and comfort.
Q: What are the fastest no-sew t-shirt refashions I can do right now?
A: The fastest no-sew t-shirt refashions are knot-front crops, tied halters, simple back cutouts, off-shoulder pulls, braided straps, and a basic tank shift made with strategic cutting and knots.
Q: What tools and materials do I need for most t-shirt refashions?
A: Most t-shirt refashions need sharp fabric scissors, pins, basic thread and needles or a sewing machine, a marker for tracing, and optional elastic or interfacing for structure and stretch control.
Q: Do I need a sewing machine, and when is hand sewing okay?
A: Deciding between a sewing machine and hand sewing depends on stretch finishes and volume; a machine gives stronger, stretch-friendly seams, while hand sewing works for small hems or simple embellishments.
Q: What cutting techniques matter most for good fit and symmetry?
A: Good fit and symmetry come from accurate measuring, folding the shirt for mirrored cuts, tracing simple templates, and checking proportions against your body before finishing edges.
Q: Which t-shirt fabrics work best for refashioning into tops?
A: Choosing t-shirts with medium-weight jersey knit or cotton blends gives the best structure and stretch; very thin or slippery fabrics can be trickier but still usable with backing or stabilizers.
Q: How long will a typical refashion project take?
A: A typical refashion takes 10 minutes for a quick no-sew crop, 30–60 minutes for basic sewn tanks or off-shoulder styles, and a couple hours for multi-shirt or embellished projects.
Q: What are quick embellishments that improve a refashioned top?
A: Quick embellishments that improve a top include adding lace trims, fabric flowers, simple appliqués, iron-on patches, bead clusters, or a ribbon tie—each gives a polished look with minimal effort.
Q: How can I combine two or more t-shirts into one new top?
A: Combining t-shirts into one new top means cutting panels from each shirt, matching stretch and weight, layering or color-blocking at seams, and sewing or tacking panels together for a cohesive silhouette.
Q: What basic sewing techniques should I know for knit t-shirts?
A: Knowing zig-zag or stretch stitches, using a ballpoint needle, finishing raw edges with a narrow hem, and gentle gathering for shape will cover most knit t-shirt refashions cleanly.
Q: How should I wash and care for refashioned t-shirt tops?
A: Washing and caring for refashioned t-shirt tops means using cool water, a gentle cycle, and laying flat to dry or using low heat to protect seams, elasticity, and any added trims.